


You know, some recipes are just… special. They aren’t just food; they’re memories. They’re the smell of home, the sound of happy munching, and that warm fuzzy feeling that only truly great comfort food can give you. This Chocolate Chip Cookie recipe is one of those for me. It’s the one my mom made, the one I’ve tweaked over the years, and the one that, without fail, disappears faster than you can say “second helping.” If you’ve ever tried those bakery-style cookies that are a little cakey, a little chewy, and absolutely packed with chocolatey goodness, then you know the kind of magic we’re talking about here. Forget those flat, crispy discs or those dry, crumbly messes. This, my friends, is the ultimate chocolate chip cookie recipe.
What is the best chocolate chip cookie recipe?
So, what makes this recipe the absolute best Chocolate Chip Cookie recipe? It’s all about balance! Think of it as the Goldilocks of cookies – not too cakey, not too thin, just perfectly chewy in the center with slightly crisp edges. It’s essentially your classic chocolate chip cookie, but elevated. We’re talking about using good quality ingredients, a specific chilling method that really lets the flavors meld, and a secret weapon ingredient that I’ll share with you soon. It’s the kind of cookie that makes you close your eyes with the first bite and just savor the moment. It’s approachable enough for a beginner baker but has enough depth of flavor and texture to impress even the most seasoned cookie connoisseur. It’s the reliable friend in your recipe collection, the one you can always count on for a sweet treat.
Why you’ll love this recipe?
Honestly, where do I even begin with why you’ll adore this Chocolate Chip Cookie recipe? Firstly, the flavor is out of this world. It’s that perfect blend of sweet, buttery dough with pockets of melted chocolate that just burst in your mouth. I’ve tried so many chocolate chip cookie recipes over the years, and this one hits every single note. Then there’s the simplicity. Seriously, even if you’re convinced you’re not a baker, you can totally nail this. The steps are straightforward, and the payoff is HUGE. And let’s talk about cost-efficiency – most of the ingredients are pantry staples you probably already have. No fancy, expensive ingredients here! What I love most about this chocolate chip cookie recipe, though, is its versatility. It’s fantastic on its own, of course, but it’s also incredible served warm with a scoop of vanilla ice cream. It’s the perfect treat for a cozy night in, a crowd-pleasing dessert for parties, or even just a little pick-me-up during a tough week. It’s the kind of recipe that makes you feel like a baking rockstar without any of the fuss. This recipe truly stands out because it delivers on all fronts: incredible taste, forgiving technique, and pure joy with every bite.
How do I make chocolate chip cookie?
Quick Overview
Making these cookies is a breeze, and I promise, the results are so worth it. You’ll start by creaming butter and sugars, then adding eggs and vanilla. Dry ingredients get mixed separately and then gently combined with the wet. The magic happens when you chill the dough – this is key for flavor and texture! Then, you’ll scoop, bake until golden, and let them cool. Simple, right? It’s a foolproof process designed to give you that perfect Chocolate Chip cookie every single time. You don’t need any fancy equipment, just a couple of bowls, a whisk, and a baking sheet.
Ingredients
For the Main Cookie Dough: For the Main Cookie Dough: For the Main Cookie Dough: For the Main Cookie Dough: For the Main
2 ¼ cups all-purpose flour (I always use a good quality, unbleached flour for the best texture)
1 teaspoon baking soda (this is crucial for the lift!)
½ teaspoon salt (enhances all those sweet flavors)
1 cup (2 sticks) unsalted butter, softened (use good butter; it makes a difference!)
¾ cup granulated sugar
¾ cup packed Brown Sugar (light or dark, both work wonderfully; brown sugar adds that chewy texture and caramel notes)
2 large eggs, at room temperature (room temp eggs incorporate better)
1 teaspoon pure vanilla extract (don’t skimp on this; pure vanilla is a game-changer)
2 cups semi-sweet chocolate chips (I love a mix of semi-sweet and dark chocolate chunks for extra richness!)
For Optional Added Texture/Flavor:
½ cup chopped nuts (pecans or walnuts are fantastic here, if you like them!)
½ cup white or milk chocolate chips (for a fun swirl of different chocolate flavors)
Step-by-Step Instructions
Step 1: Preheat & Prep Pan
First things first, let’s get your oven ready. Preheat it to 375°F (190°C). While the oven is warming up, line two baking sheets with parchment paper. This isn’t strictly necessary, but it makes cleanup a dream and ensures your cookies don’t stick. Trust me, I’ve learned the hard way!
Step 2: Mix Dry Ingredients
In a medium bowl, whisk together your flour, baking soda, and salt. Whisking them together ensures the leavening agent and salt are evenly distributed, which means your cookies will bake up evenly. Set this bowl aside for now.
Step 3: Mix Wet Ingredients
In a large bowl, using an electric mixer (or a sturdy whisk and some elbow grease!), cream together the softened butter, granulated sugar, and packed brown sugar. Beat until the mixture is light and fluffy, almost like a pale yellow cloud. This usually takes about 2-3 minutes. This creaming process is where you incorporate air, which contributes to the cookie’s texture. Next, beat in the eggs one at a time, making sure each is fully incorporated before adding the next. Stir in the pure vanilla extract. The mixture should look smooth and creamy.
Step 4: Combine
Now, it’s time to bring the wet and dry ingredients together. Gradually add the dry ingredients to the wet ingredients, mixing on low speed (or stirring gently with a spatula) until just combined. Be careful not to overmix! Overmixing develops the gluten in the flour, which can lead to tough cookies. You want to stop as soon as you don’t see any more streaks of flour. If you’re adding nuts or other chips, gently fold them in now.
Step 5: Chill the Dough (The Secret Weapon!)
This step is crucial and I know it’s tempting to skip it, but please don’t! Cover the bowl with plastic wrap and refrigerate the dough for at least 30 minutes, or ideally for 2-3 hours. You can even make the dough a day ahead! Chilling the dough allows the fats to firm up, which prevents the cookies from spreading too much in the oven, giving you that perfect thickness. It also allows the flavors to deepen and meld together, resulting in a much richer taste. I’ve found that the longer it chills (within reason!), the better the cookie.
Step 6: Scoop the Dough
Once the dough is chilled and firm, it’s time to scoop! Use a cookie scoop (about 1.5 to 2 tablespoons) to drop rounded balls of dough onto your prepared baking sheets. Leave about 2 inches between each cookie, as they will spread a bit.
Step 7: Bake
Bake for 9-12 minutes, or until the edges are golden brown and the centers look slightly underbaked. They will continue to cook on the hot baking sheet after you remove them from the oven. This is what gives you that perfect chewy center. Ovens can vary, so keep an eye on them the first time you make these.
Step 8: Cool & Enjoy
Let the cookies cool on the baking sheets for 5 minutes before carefully transferring them to a wire rack to cool completely. This allows them to set up properly. If you’re impatient like me, grab one while it’s still warm – pure heaven!
What to Serve It With
These chocolate chip cookies are so versatile, they truly go with everything! For breakfast, I love them with a strong cup of black coffee. The bitterness of the coffee is the perfect counterpoint to the sweet cookie. They’re also surprisingly good with a glass of cold milk – a childhood classic that never gets old. For a more elegant brunch spread, I like to arrange them on a pretty platter, perhaps with some fresh berries or a small bowl of whipped cream. They add a delightful homemade touch that guests always rave about. As a dessert, well, the possibilities are endless! They are absolutely divine served warm with a scoop of good quality vanilla bean ice cream. You can also get fancy and serve them with a drizzle of caramel sauce or a dusting of powdered sugar. For those cozy snack moments, I just grab one (or two!) straight from the cookie jar, maybe with a cup of tea or hot chocolate. My kids especially love having them for an after-school snack, often requesting them with a glass of chocolate milk. Honestly, they’re so good, they don’t *need* anything else, but pairing them can elevate the experience.
Top Tips for Perfecting Your Chocolate Chip Cookies
I’ve been making variations of this chocolate chip cookie recipe for ages, and over time, I’ve picked up a few tricks that I think really make a difference. First, about the butter: make sure it’s softened, not melted. Softened butter creams better with the sugar, creating air pockets that give the cookies their structure. If it’s too cold, it won’t cream properly, and if it’s melted, your cookies will spread way too much and become flat. For your sugars, I strongly recommend using both granulated and brown sugar. The granulated sugar gives them crisp edges, while the brown sugar, with its molasses content, provides that signature chewy texture and a lovely caramel undertone. Don’t be afraid to pack that brown sugar into the measuring cup – it’s important for that chewy factor. When you’re mixing the wet and dry ingredients, remember that “just combined” is your mantra. Overmixing is the enemy of tender cookies. Once you see the last bit of flour disappear, stop mixing. Seriously, it’s better to have a few tiny streaks of flour than to overwork the dough. The chilling step is non-negotiable in my book. It’s not just about preventing spread; it allows the flavors to deepen. Think of it like letting a good stew simmer – the longer it cooks, the better the flavors get. I’ve tested this recipe with different chilling times, and I find that at least 30 minutes is essential, but 2-3 hours or even overnight makes a noticeable difference in richness. For your chocolate chips, don’t just stick to one type. I love using a combination of semi-sweet chips and dark chocolate chunks. The chunks melt into gorgeous pools of chocolate, while the chips provide consistent little bursts of flavor. If you’re feeling adventurous, try adding a pinch of flaky sea salt on top of the cookies right after they come out of the oven. It sounds a little fancy, but that saltiness is an absolute revelation against the sweet chocolate.
Storing and Reheating Tips
One of the best things about this chocolate chip cookie recipe is how well they store. Once they’ve cooled completely, you can store them in an airtight container at room temperature for up to 3-4 days. I usually place a piece of parchment paper between layers to prevent them from sticking together, especially if it’s a bit humid. They tend to stay nice and chewy this way. If you find they’re starting to get a little dry, you can even pop a slice of bread into the container for a day – it helps to reintroduce moisture. If you need to store them for longer, the refrigerator is your friend. They’ll last about a week in an airtight container in the fridge, though they can become a bit firmer. To reheat them, just pop one or two in a low oven (around 300°F or 150°C) for about 5-8 minutes, or microwave them for about 10-15 seconds. They come back to life beautifully! For longer storage, freezing is an excellent option. You can freeze the baked cookies by wrapping them tightly in plastic wrap, then placing them in a freezer-safe bag or container. They’ll keep well for up to 2-3 months. Thaw them at room temperature or gently reheat them. You can also freeze the cookie dough! Scoop balls of dough onto a baking sheet, freeze them until firm, then transfer them to a freezer bag. When you’re ready for a fresh-baked cookie, just bake them straight from frozen, adding a minute or two to the baking time. This is a lifesaver when you want just one or two cookies!
Frequently Asked Questions
Final Thoughts
So there you have it – my absolute favorite chocolate chip cookie recipe. It’s the recipe that brings smiles to faces, makes ordinary days feel special, and always ends up being the first thing to disappear from the dessert table. I truly believe that good food, especially homemade treats like these, has the power to connect us and create lasting memories. If you love a good chewy cookie with perfectly crisp edges and an abundance of chocolate, then you absolutely have to give this a try. It’s more than just a recipe; it’s an experience. I encourage you to make it, share it, and maybe even adapt it to your own family’s tastes – that’s the joy of home baking! If you try this chocolate chip cookie recipe, please let me know how it turns out in the comments below. I love hearing your success stories and any fun twists you come up with! Happy baking, and enjoy every single delicious bite!
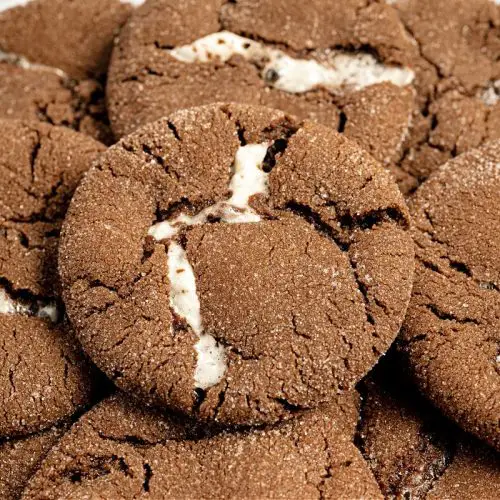
Chocolate Chip Marshmallow Cookies
Ingredients
Main Ingredients
- 10 tablespoons unsalted butter softened to room temperature
- 0.5 cup light brown sugar packed
- 0.75 cup granulated sugar divided
- 1 large egg
- 1 teaspoon vanilla extract
- 2.25 cups all-purpose flour
- 1 ounce packet hot chocolate mix
- 3 tablespoons unsweetened cocoa powder
- 0.5 teaspoon baking soda
- 0.5 teaspoon kosher salt
- 120 mini marshmallows
Instructions
Preparation Steps
- Preheat oven to 350 degrees F. Line a cookie sheet with parchment paper, set it aside.
- In a large mixing bowl, beat butter, brown sugar, and 0.5 cup of granulated sugar together until fluffy (about 2-3 minutes with an electric mixer). Add in egg and vanilla extract and beat until incorporated.
- Add flour, hot chocolate mix, cocoa powder, baking soda and salt, just until a dough forms. Do not over mix.
- Use a 1.5- 2 tablespoon cookie scoop to scoop out 24 even sized scoops of dough. Roll into a ball then flatten into a disc. Place several inches apart on prepared cookie sheet. Top with about 5-6 mini marshmallows, then wrap the dough around the marshmallows, pinching the seams closed. Roll dough until smooth, then roll in remaining 0.25 cup of granulated sugar to coat them.
- Bake cookies for about 10-12 minutes, or until the tops have cracked and the marshmallows are visible. Remove from oven and cool on wire racks for about 15 minutes.


