


You know those moments? The ones where you’re craving something utterly decadent, something that feels like a warm hug and a sophisticated treat all at once? For me, that moment almost always leads me straight to my kitchen, armed with a whisk and a mission: to create the most divine caramel coffee crème brûlée. Forget those fancy restaurant versions that feel untouchable; this is the recipe that has become my absolute go-to. It’s a little bit nostalgic, a lot bit delicious, and surprisingly achievable, even on a weeknight when you *really* need that little pick-me-up. Honestly, it’s the perfect way to elevate a quiet evening at home or to impress friends without breaking a sweat. If you’ve ever thought crème brûlée was too complicated, let me tell you, this version will change your mind entirely. It’s a game-changer, folks!
What is caramel coffee crème brûlée?
So, what exactly *is* caramel coffee crème brûlée? Imagine your classic, silky-smooth vanilla crème brûlée, but with a delightful twist. We’re infusing that rich, creamy custard with the deep, comforting flavors of coffee and swirling in ribbons of gooey, homemade caramel. Think of it as a luxurious coffee break transformed into a dessert. The name itself, “crème brûlée,” is French for “burnt cream,” and that’s the magic: a perfectly set, unbelievably smooth custard topped with a crisp, crackly layer of caramelized sugar that you shatter with your spoon. This caramel coffee variation just takes that classic experience and dials it up with those warm, familiar notes of your favorite brew and sweet, golden caramel. It’s essentially pure comfort in a ramekin, elevated to dessert royalty!
Why you’ll love this recipe?
Oh, where do I even begin with why you’ll adore this caramel coffee crème brûlée? First off, the FLAVOR. It’s an absolute symphony in your mouth. The subtle bitterness of the coffee cuts through the richness of the cream and egg yolks, creating a perfectly balanced custard that’s not too sweet. Then there’s the caramel – it adds this incredible depth, a toasty, buttery sweetness that just melts into the coffee notes. It’s like a perfectly brewed cup of coffee met a decadent caramel candy and had a delicious baby. And the TEXTURE! The custard is impossibly smooth, like velvet, and then you hit that crunchy, caramelized sugar crust. The contrast is pure bliss.
Beyond the incredible taste, it’s surprisingly SIMPLE to make. Seriously. Once you get the hang of tempering the eggs (which I’ll walk you through!), the rest is a breeze. I used to be intimidated by crème brûlée, thinking it was a high-maintenance dessert, but this recipe is so forgiving. And let’s talk COST-EFFICIENCY. When you break it down, the ingredients are pretty basic pantry staples: cream, eggs, sugar, coffee, and a little butter and cream for the caramel. You’re getting a dessert that tastes like it came from a five-star restaurant for a fraction of the price.
Plus, it’s incredibly VERSATILE. While I love it served just as is, you can totally play around with it. Want a hint of chocolate? Add a tablespoon of cocoa powder to the custard. Feeling fancy? A sprinkle of sea salt on top of the caramelized sugar is divine. I’ve even made mini versions in espresso cups for a tiny, perfect bite. This recipe is a lifesaver when you need a special dessert for guests but don’t want to spend all day in the kitchen. It’s one of those recipes that makes you feel like a culinary genius without all the fuss. It’s my secret weapon for spontaneous dinner parties, and it always gets rave reviews!
How do I make caramel coffee crème brûlée?
Quick Overview
This caramel coffee crème brûlée recipe is all about building layers of flavor and achieving that signature silky custard texture. We’ll gently warm the cream with coffee, temper the egg yolks, bake them in a water bath until just set, and then finish with that iconic crackly caramelized sugar topping, swirled with homemade caramel. It’s a process that requires a little patience, but the payoff is absolutely worth it. You’ll end up with a dessert that’s elegant, comforting, and utterly unforgettable. Trust me, the simple steps are the key to its success!
Ingredients
For the Main Custard:
2 cups heavy cream (Don’t skimp here! The fat content is crucial for that luxurious texture.)
1/4 cup strong brewed coffee or espresso (Use your favorite! This is where the coffee flavor really shines.)
1/2 cup granulated sugar, plus more for topping (Classic white sugar works best for that perfect caramelization.)
5 large egg yolks (Room temperature eggs incorporate more smoothly.)
1 teaspoon pure vanilla extract (Enhances all the other flavors.)
Pinch of salt (Balances the sweetness.)
For the Homemade Caramel Swirl:
1/2 cup granulated sugar
2 tablespoons water
1/4 cup heavy cream, warmed (Warming prevents seizing.)
1 tablespoon unsalted butter, softened (Adds richness and gloss.)
1/4 teaspoon sea salt, or to taste (Optional, but highly recommended for that salted caramel vibe.)
Step-by-Step Instructions
Step 1: Preheat & Prep Pan
First things first, let’s get our oven ready. Preheat it to 300°F (150°C). This low and slow baking is key to a super smooth custard. Next, grab your ramekins – I like using 4-6 ounce ramekins. Arrange them in a large, shallow baking dish. You’ll need enough room for them to sit without touching. Now, boil some water. You’ll need enough to come about halfway up the sides of your ramekins when they’re in the baking dish – this is our water bath, or “bain-marie,” which helps the custards cook gently and evenly, preventing them from cracking or getting rubbery. Pour the hot water into the baking dish around the ramekins. Be careful not to splash any into the ramekins themselves!
Step 2: Mix Dry Ingredients
In a medium bowl, whisk together the 1/2 cup granulated sugar for the custard, the 5 egg yolks, and that pinch of salt. Whisk them until the mixture is pale yellow and slightly thickened. You don’t need to go crazy here; just make sure there are no streaks of egg yolk and that the sugar is mostly incorporated. This step is important for ensuring the sugar dissolves and the yolks are ready to emulsify with the cream.
Step 3: Mix Wet Ingredients
In a medium saucepan, combine the 2 cups of heavy cream and the 1/4 cup of strong brewed coffee. Heat this mixture over medium heat, stirring occasionally, until it’s just simmering around the edges. You don’t want it to boil vigorously, just get nice and hot. Once it’s hot, remove it from the heat and stir in the 1 teaspoon of vanilla extract. The warm cream is going to gently “cook” the egg yolks, but we have to do it gradually so we don’t scramble them!
Step 4: Combine
This is where we temper the eggs, and it’s the most crucial step! Slowly, very slowly, start ladling about a quarter cup of the hot cream mixture into the egg yolk mixture while whisking constantly. Keep whisking! After you’ve added a bit of the hot cream, go back and add another ladleful, still whisking. Continue this process, gradually adding more hot cream, until you’ve incorporated about half of the cream mixture into the yolks. This gradual warming prevents the eggs from cooking into scrambled eggs. Once tempered, pour the yolk mixture back into the saucepan with the remaining cream. Stir everything together gently.
Step 5: Prepare Filling
Now for the star of the swirl: the caramel! In a small, heavy-bottomed saucepan, combine the 1/2 cup granulated sugar and 2 tablespoons of water. Stir them together just until the sugar is moistened. Place the saucepan over medium heat and let it bubble away, *without stirring*, until it turns a deep amber color. This can take anywhere from 5-10 minutes, so watch it closely! Once it reaches that beautiful amber hue, immediately remove it from the heat and carefully stir in the warmed heavy cream. It will bubble up furiously – that’s normal! Stir until smooth. Then, stir in the softened butter and sea salt (if using). The butter makes it silky, and the salt cuts through the sweetness. Let it cool for a few minutes; it will thicken as it cools.
Step 6: Layer & Swirl
Carefully ladle the custard mixture into your prepared ramekins, filling them almost to the top. Now, take your slightly cooled caramel sauce. Drizzle about a tablespoon of caramel over the surface of each custard. Then, grab a toothpick or a skewer and gently swirl the caramel into the custard. You can create simple swirls or more intricate patterns – whatever strikes your fancy! The goal is to get those lovely ribbons of caramel distributed throughout the custard. Don’t overmix; you want distinct swirls.
Step 7: Bake
Carefully place the baking dish with the ramekins into the preheated oven. Bake for 30-40 minutes, or until the edges of the custards are set, but the centers are still slightly jiggly when you gently shake the dish. The cooking time can vary depending on your oven and ramekin size, so keep an eye on them. You can also test for doneness by inserting a knife near the center; it should come out mostly clean. Overbaking will result in a rubbery texture, so err on the side of underbaking slightly, as they will continue to set as they cool.
Step 8: Cool & Glaze
Once baked, carefully remove the baking dish from the oven. Let the ramekins sit in the water bath for another 10-15 minutes to continue cooking gently. Then, carefully lift the ramekins out of the water bath and place them on a wire rack to cool completely to room temperature. Once they’ve cooled, cover each ramekin with plastic wrap and refrigerate for at least 4 hours, or preferably overnight. This chilling time is essential for the custard to firm up completely. Just before serving, sprinkle a thin, even layer of granulated sugar over the top of each chilled custard. This is where the magic happens – grab a kitchen torch and toast the sugar until it’s deeply caramelized and forms a glass-like crust. If you don’t have a torch, you can briefly put them under a hot broiler, watching *very* carefully to prevent burning. It’s all about that satisfying crack when you tap the sugar!
Step 9: Slice & Serve
The moment of truth! Present your beautifully caramelized custards. When your guests (or you!) tap the sugar crust with a spoon, it should shatter with a satisfying crack. The contrast between the brittle, burnt sugar and the cool, creamy custard is what makes crème brûlée so special. Serve immediately after torching for the best texture. Enjoy the delightful combination of coffee, caramel, and creamy custard!
What to Serve It With
This caramel coffee crème brûlée is practically a standalone star, but pairing it with the right accompaniments can elevate it even further. For a delightful BREAKFAST treat, especially on a leisurely weekend, I love serving it alongside a really good, dark roast coffee or a rich espresso. The flavors just sing together. You can also add a small side of fresh berries – raspberries or blackberries work wonderfully – to provide a little tartness that balances the sweetness.
When it comes to BRUNCH, this dessert feels wonderfully elegant. Imagine serving it after a spread of savory dishes. I like to plate it simply, perhaps with a delicate dusting of cocoa powder around the rim of the ramekin or a single coffee bean placed on top. For beverages, a sparkling rosé or a light moscato pairs beautifully, offering a touch of bubbly elegance.
As a full-blown DESSERT, it’s absolutely perfect. After a nice dinner, this is pure indulgence. I often serve it with a small scoop of vanilla bean Ice Cream or a dollop of lightly sweetened whipped cream. Sometimes, I’ll add a very thin drizzle of extra caramel sauce if I’m feeling extra decadent. A small espresso martini or a rich dessert wine like a port also makes for a sophisticated pairing.
And for those COZY SNACKS, when you just need a little something sweet to curl up with, this crème brûlée hits the spot. Enjoy it with a mug of Hot Chocolate or a warming tea. It’s the perfect end to a cozy evening spent reading or watching a movie. My family loves having this as a special weekend treat after a simple weeknight dinner, and it always feels like a special occasion, no matter how casual the meal was beforehand.
Top Tips for Perfecting Your Caramel Coffee Crème Brûlée
Achieving that perfect, velvety custard and that signature crackly top is easier than you might think with a few key tricks. Let’s dive into some of my hard-won wisdom!
Zucchini Prep: Oops, wrong recipe! My mind wandered for a second there. For this caramel coffee crème brûlée, we’re not dealing with zucchini, but the principle of proper prep applies. For the custard base, ensure your egg yolks are at room temperature. They emulsify much better with the warm cream that way, leading to a smoother, more homogenous custard. Also, use good quality heavy cream; the fat content is essential for richness and texture. Don’t try to substitute with lower-fat options unless you’re prepared for a less luxurious result.
Mixing Advice: The biggest pitfall here is scrambling the eggs. That’s why tempering is so important. Always add the hot cream to the yolks *gradually* while whisking constantly. Once combined, strain the custard mixture through a fine-mesh sieve. This is a non-negotiable step for me! It catches any bits of cooked egg yolk or any stray chalaza (the white stringy bits) and ensures an ultra-smooth texture. Don’t overmix the batter once the eggs are in; you want to avoid incorporating too much air, which can lead to bubbles on the surface of your baked custard.
Swirl Customization: When it comes to the caramel swirl, experiment with how you drizzle and swirl. For more distinct caramel patterns, let your caramel sauce cool for a few more minutes until it’s slightly thicker before drizzling. For a more marbled effect, use a toothpick to create figure-eights or random patterns. If you’re feeling adventurous, you can even drizzle a bit of the caramel onto the surface *after* torching the sugar for an extra layer of flavor and visual appeal, though be mindful it can soften the crisp top.
Ingredient Swaps: While this recipe is perfected with standard ingredients, I have experimented! For the coffee, if you don’t have brewed coffee, you can use a tablespoon of instant espresso powder dissolved in the cream. If you’re not a coffee drinker but love the caramel aspect, you can simply omit the coffee and increase the cream slightly or add a touch more vanilla for a classic caramel crème brûlée. For a vegan version, it’s a bit trickier as eggs are essential for the custard’s structure. I haven’t perfected a vegan version yet, but many folks have success with Coconut Cream and cornstarch or agar-agar, though the texture will be different.
Baking Tips: The water bath is your best friend. It creates a humid environment, ensuring the custards cook gently and evenly, preventing the edges from cooking too quickly while the center remains unset. Don’t be tempted to crank up the oven temperature. Low and slow is the mantra here. Also, remember that ovens can vary greatly. Get to know your oven; an oven thermometer can be a lifesaver. If your custards seem a little too wobbly after the suggested baking time, let them sit in the oven with the door slightly ajar for an extra 10 minutes. They’ll firm up considerably as they chill.
Glaze Variations: The sugar topping is key, but don’t be afraid to get creative! For a slightly different flavor, you can try using a dark Brown Sugar for the topping, though it might caramelize a bit differently. A pinch of flaky sea salt sprinkled over the hot, caramelized sugar right after torching adds a wonderful sweet-and-salty dimension. If you don’t have a kitchen torch, you can use your oven’s broiler. Place the ramekins on a baking sheet and broil on high, about 4-6 inches from the heat source, rotating them frequently until the sugar is caramelized. Watch it like a hawk – it can go from perfect to burnt in seconds!
Storing and Reheating Tips
This caramel coffee crème brûlée is best enjoyed the day it’s made, especially after the sugar topping has been torched. However, if you have leftovers or want to prep ahead, here’s how to store and reheat them properly to maintain that delicious quality.
Room Temperature: Once the custards have been baked and cooled to room temperature, they are still quite delicate. They are best stored in the refrigerator and *not* left out at room temperature for extended periods, especially if they have been torched. The torched sugar will start to weep and lose its crispness relatively quickly, usually within an hour or two.
Refrigerator Storage: If you’ve made the custards but haven’t torched them yet, cover them tightly with plastic wrap and they will keep well in the refrigerator for up to 2-3 days. Ensure the plastic wrap is sealed directly onto the surface of the custard to prevent a skin from forming. If they have already been torched, they are still edible for about 24 hours, but the caramel crust will become soft and chewy. For the best experience, it’s ideal to chill them un-torched and torch them right before serving.
Freezer Instructions: I generally don’t recommend freezing crème brûlée. The custard base, particularly with the dairy and egg yolks, can change texture upon thawing, becoming grainy or watery. It just doesn’t hold up well to the freezing and thawing process. It’s much better to make them fresh or store them in the refrigerator for a few days.
Glaze Timing Advice: This is crucial! For the crispiest topping, always torch the sugar *immediately* before serving. The sugar absorbs moisture from the custard and the air, causing it to soften. So, if you’re prepping ahead, make your custards, chill them, and then when you’re ready to serve, sprinkle the sugar evenly and torch away! If you have leftovers that were torched the day before, they’ll be softer, but the custard itself will still be delicious. You can gently reheat the custard by placing the ramekin in a warm water bath (similar to baking but much shorter, just to warm through), but the top will be soft.
Frequently Asked Questions
Final Thoughts
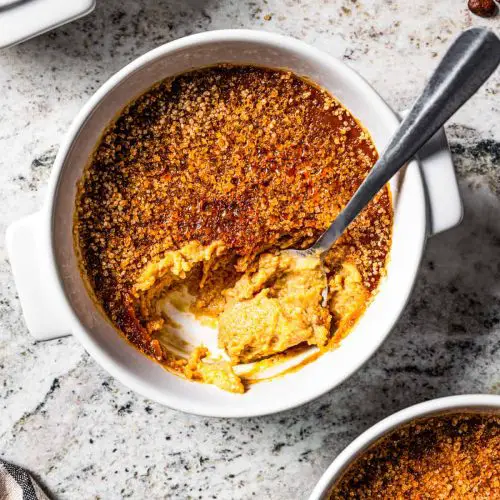
So there you have it – my beloved caramel coffee crème brûlée! It’s more than just a dessert; it’s an experience. That moment when the spoon cracks through the caramelized sugar and you hit that unbelievably smooth, coffee-kissed custard is pure magic. It’s the perfect blend of rich, comforting flavors and elegant simplicity, making it an absolute winner for any occasion, from a quiet night in to a fancy dinner party. I truly believe this recipe will become a staple in your kitchen, just like it has in mine. It’s proof that you don’t need to be a pastry chef to create something truly spectacular.
If you love the idea of elevated coffee flavors in your desserts, you might also enjoy my [link to another coffee-themed dessert recipe, e.g., Espresso Chocolate Mousse] or my [link to a caramel recipe, e.g., Salted Caramel Sauce]. They’re both wonderful ways to satisfy those sweet cravings! I can’t wait to hear what you think of this caramel coffee crème brûlée. Please leave a comment below with your thoughts, or share a photo of your creation on social media – I love seeing your culinary adventures! Happy baking, and even happier eating!
caramel coffee creme brulee
Ingredients
Main Ingredients
- 0.5 cup heavy whipping cream
- 2 teaspoons dark-roast instant coffee grounds
- 6 egg yolks
- 0.333 cup granulated sugar
- 0.125 teaspoon salt
- 1.5 cups heavy whipping cream
- 0.333 cup caramel sauce
- 4 teaspoons raw sugar for broiling
Equipment
- 6 oz ramekins 4 pieces
- roasting pan for water bath
- saucepan for infusing coffee
Instructions
Preparation Steps
- Prepare the coffee cream. In a small saucepan, pour in 0.5 cup of heavy whipping cream and the coffee grounds; bring to a simmer and remove from heat. Cover and let steep for about 30 minutes.
- Preheat the oven to 325ºF.
- In a large bowl, whisk the egg yolks, granulated sugar, and salt until well blended; set aside.
- Pour the caramel sauce into a separate bowl and add 1.5 cups of heavy whipping cream. Strain the coffee-infused cream into the caramel cream; discard the coffee grounds.
- Slowly whisk the cream mixture into the egg mixture until well combined and uniform in color.
- Arrange 4 (6 oz.) ramekins in a roasting pan. Divide the custard mixture evenly among the ramekins.
- Pour enough boiled water into the roasting pan to come halfway up the sides of the ramekins to create a water bath.
- Bake for 1 hour and 10 minutes, or until the custards are set but still slightly jiggly in the center. Remove ramekins from the water bath and let them cool at room temperature for 40 minutes, then refrigerate.
- Remove ramekins from fridge and sprinkle the top of each custard with 1 teaspoon of raw sugar. Place on a baking sheet and broil for 2 minutes, or until the sugar melts and turns golden brown.
- Refrigerate for at least 3 hours before serving. Serve cold, optionally with extra caramel drizzle.


