


I’ll never forget the first time I folded a silky ricotta filling into a little shell that wasn’t fried, but baked to a crisp, golden edge. The kitchen smelled like citrus and vanilla and a hint of warm butter, and I swear the entire house paused for that moment of sweet anticipation. Cannoli cups, to me, are the friendly version of the classic cannoli—less mess, more joy. They’re what I reach for when I want something that feels special but isn’t a marathon in the kitchen. They’re incredibly forgiving too: you can swap in a few ingredients, lean on pantry staples, and still end up with something that tastes like a hug in a dessert form. This is the recipe I bring to gatherings, to busy weeknights, to a coffee date with a friend—the one that disappears from the tray in minutes and leaves everyone asking for seconds. Yes, cannoli cups have a way of turning ordinary moments into a shared, sweet memory.
What is cannoli cup?
Think of cannoli cups as a more approachable, bake-friendly cousin to the traditional cannoli. It’s essentially ricotta‑based filling tucked inside a delicate, crisp shell formed by pressed dough baked in mini muffin tins. The result is a bite-sized pastry that you can customize with citrus zest, chocolate, pistachios, or a glossy glaze. The name itself hints at the concept: a cup you can fill, almost like a tiny dessert cup you’d see at a fancy pastry shop, but with the warmth and accessibility of something you’d make at home. My take on cannoli cups keeps that classic ricotta dream intact while giving you a shell that stays sturdy yet tender. It’s the perfect balance of texture and brightness—enough sweetness to satisfy a late-night craving, without feeling heavy or fussy. And yes, you can make them ahead and still have that “fresh from the oven” feel when you plate them. Cannoli cups are basically a celebration in a tiny, handheld bite.
Why you’ll
What I love most about these cannoli cups is how they feel celebratory without being intimidating. The moment you bite into one, the shell crackles ever so slightly, revealing a luxuriously creamy ricotta filling that’s bright with vanilla and lemon zest. The contrast—crunchy shell versus silky filling—never gets old, and the aroma alone puts a smile on everyone’s face. These cups also happen to be surprisingly forgiving, which makes them a lifesaver on busy nights. I’ve pulled them together in under an hour, and the kids are convinced they’re little treasure cups in their own right. Another big win: you can customize the filling and toppings to suit what you’ve got in the pantry. If you’ve got a craving for something that feels indulgent but doesn’t require standing over a hot stove all evening, cannoli cups fit the bill perfectly. They’re budget-friendly, too—a few pantry staples turn into something special that’ll impress guests without breaking the bank. And yes, they pair beautifully with coffee, so they’re a natural on weekend brunch boards or after-dinner dessert spreads. If you’re new to this style, you’ll find the technique surprisingly flexible—the shells tolerate minor flavor tweaks, and the filling responds beautifully to citrus zest or a touch of Cream Cheese for extra silkiness. This is the kind of recipe you’ll come back to again and again, because it’s consistently reliable and endlessly adaptable.
How to Make Cannoli Cups
Quick Overview
These cannoli cups start with a simple, lightly sweetened dough pressed into mini-muffin cups and baked until the edges golden and crisp. The filling is a lush blend of ricotta, a whisper of vanilla, a splash of lemon or orange zest, and a handful of mini chocolate chips. You can fold in a touch of mascarpone for extra creaminess or switch to vanilla yogurt if you want a lighter texture. After the shells cool, you pipe or spoon the filling into each cup, then drizzle with a glaze or dust with powdered sugar and pistachio bits. The result is something you can assemble ahead, chill briefly, and plate with confidence. Cannoli cups are ideal for make-ahead entertaining or a quick weeknight treat that still feels special. The best part? You control the sweetness and texture, so you can tailor them to your family’s tastes while still preserving that classic cannoli vibe.
Ingredients
For the Shells (Main Batter):
- 1 1/4 cups all-purpose flour
- 2 tablespoons granulated sugar
- 1/4 teaspoon fine salt
- 1/2 teaspoon ground cinnamon (optional)
- 4 tablespoons cold unsalted butter, diced
- 1 large egg yolk
- 2–3 tablespoons ice-cold water
- 1/2 teaspoon vanilla extract
- Finely grated zest from 1/2 lemon
For the Filling:
- 1 1/2 cups ricotta, well-drained
- 1/4 cup mascarpone (optional, for extra creaminess)
- 1/3 cup powdered sugar (plus more to taste)
- 1 teaspoon pure vanilla extract
- 1–2 teaspoons lemon or orange zest
- 1/4 cup mini chocolate chips or chopped Dark Chocolate
- A pinch of salt to brighten the filling
For the Glaze & Finish:
- 1/2 cup powdered sugar
- 1–2 tablespoons milk or cream
- 1/2 teaspoon vanilla extract
- Optional: chopped pistachios or orange zest for topping

Step-by-Step Instructions
Step 1: Preheat & Prep Pan
First things first: heat your oven to 350°F (175°C). Lightly grease a mini muffin tin and set it on the counter within easy reach. If you have parchment liners, they’ll make popping the cups out even easier—but I usually skip them and just grease well. Gather your dough ingredients and keep that lemon zest handy; this is where the bright aroma starts. I always like to chill the dough for about 15 minutes if my kitchen is warm, because cold dough holds shape much better when you press it into the cups. The smell of the butter and lemon when it hits the air is a hint of the sweetness to come, and it makes this whole process feel like a little ritual.
Step 2: Mix Dry Ingredients
In a small bowl, whisk together the flour, sugar, salt, and cinnamon (if using). The goal here is to distribute the sugar and spices evenly so every bite is balanced. I always sift the dry mix once if I can, not because it’s necessary, but because it makes the dough feel lighter and more tender. You’ll notice the fragrance of cinnamon waking up as you mix—the hint of warmth in the batter is what I love about these shells.
Step 3: Mix Wet Ingredients
In another bowl, beat the egg yolk with the vanilla, lemon zest, and a splash of cold water. The idea is to have a cohesive, slightly tacky moisture that will bind the dough without making it tough. I keep the water to a minimum; you can add more if the dough seems dry, but you want it to come together in a soft, pliable way. The citrus zest is the magic here—it brightens every bite and makes the filling feel sun-kissed even on a cold night.
Step 4: Combine
Pour the wet into the dry and mix just until it comes together. The texture should be crumbly and slightly rough—this is how the shells stay tender after baking. If you’ve got a pastry blender, use it so you don’t overwork the dough. Overmixing here is the number one mistake I used to make; it made shells tough instead of crisp. A few quick folds, and you’re done.
Step 5: Prepare Filling
In a bowl, blend the ricotta, mascarpone (if using), powdered sugar, vanilla, and zest until smooth. Don’t overbeat; you’re aiming for a creamy, airy texture. Stir in the chocolate chips and a pinch of salt. I like to taste as I go—if you prefer it sweeter, add a touch more sugar; if you love a citrusy zing, bump the zest a bit. For a lighter version, fold in a tablespoon of whipped cream or swap some of the ricotta for yogurt. My family loves a generous amount of vanilla, which makes the filling feel indulgent without being heavy.
Step 6: Layer & Swirl
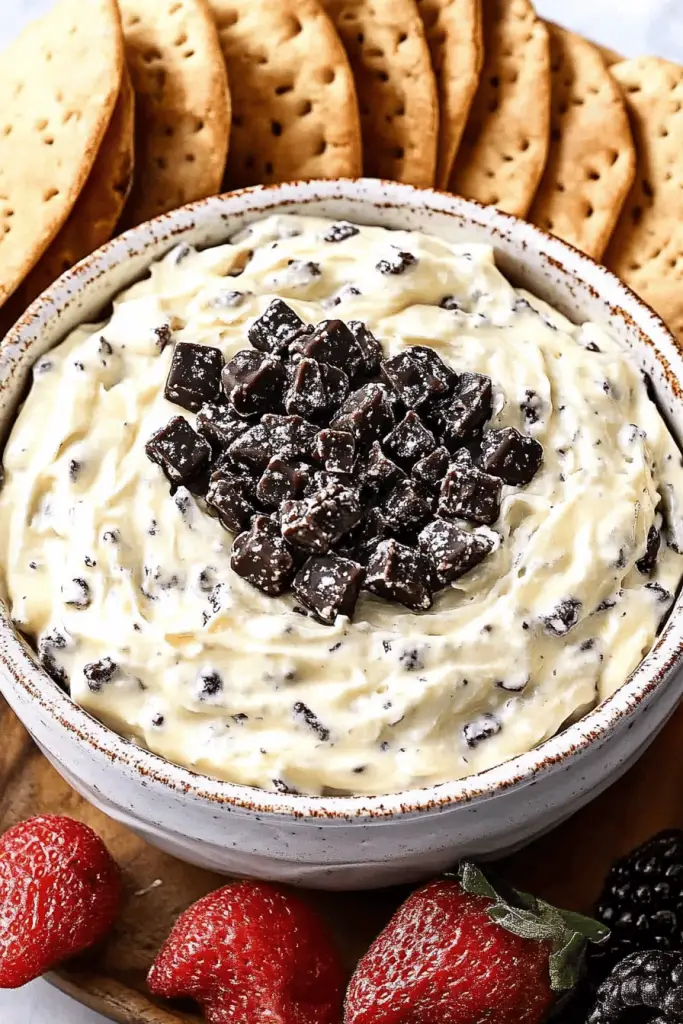
Now comes the fun part. Roll the dough into small disks, press them into the greased mini muffin cups to form little cups, and bake for about 8–10 minutes until the edges are just golden. Let the shells cool completely on a rack. Once cooled, pipe or scoop the filling into each cup. For a playful look, you can swirl a portion of the filling with a teaspoon of cocoa powder in a separate bowl to create a marbled effect—this is my kid’s favorite because it looks almost like a tiny galaxy. Top each cup with a dusting of powdered sugar, a few pistachio bits, or an orange zest ribbon for color and a pop of aroma.
Step 7: Bake
If you want an extra crisp edge, give the filled cups a quick 2–3 minute bake. This step isn’t mandatory, but it does make the shells a touch sturdier and helps the glaze set a little faster. My sheet always has a few cups that go a little crisper than the others, and the family loves the slight crunch contrasted with the creaminess inside. If your oven runs hot, keep a close eye—the goal is a light amber around the rims, not deep brown.
Step 8: Cool & Glaze
Allow the cups to cool for at least 15 minutes before glazing. Whisk the glaze ingredients until smooth; it should be pourable but thick enough to coat the backs of spoons. Drizzle a fine stream over the tops, or dip the tip of each cup for a neat finish. If you’re using pistachios or citrus zest as a finish, sprinkle them while the glaze is still tacky so they adhere. The glaze adds a glossy shine and a whisper of extra sweetness that makes the cups feel even more special.
Step 9: Slice & Serve
Just before serving, you can give the tops a light cut with a paring knife to create a clean, presentable edge, or serve as-is for rustic charm. Cannoli cups are best on the day they’re assembled, but they’ll hold in the fridge for up to 24 hours if kept in an airtight container. When you plate them, consider a small dusting of cocoa powder or a few extra chopped pistachios for color. The first bite should reveal a crisp shell, a creamy ricotta filling, and a whisper of lemon—classic cannoli vibes with a modern twist.
What to Serve It With
These cannoli cups shine as a finale, but they’re also wonderful as an add-on to various occasions. They’re bite-sized, which makes them perfect for dessert spreads, baby showers, or a casual family dinner where you want something a little fancy without fuss.
For Breakfast: A plate of cannoli cups alongside strong coffee or a frothy latte makes the morning feel special. Add a few citrus zest ribbons and a tiny spoonful of orange marmalade for a bright morning twist.
For Brunch: Pair them with a light sparkling beverage or a Vanilla Bean latte. A few berries on the side and a sprig of mint elevate the presentation and keep the flavors lively.
As Dessert: They’re elegant enough for a dinner party but friendly enough for weeknights. Serve with espresso or dessert wine, and let the lemony notes brighten the palate between bites.
For Cozy Snacks: Set out a big tray with a few different toppings—chopped pistachios, crushed biscotti, and a drizzle of chocolate—to invite guests to customize their cannoli cups. This is the exact setup I love on a chilly evening when we’re curled up with a movie.
Personally, I love offering a duo of flavors—one with pure ricotta and lemon, another with a cocoa-marble twist—to let everyone pick their favorite. Family traditions often turn into little rituals, and with cannoli cups, you can start a new one: “Make your own little dessert boat.”
Top Tips for Perfecting Your Cannoli Cups
Here are the tricks I’ve learned after making these so many times that I’ve almost memorized the smell of a perfectly baked shell.
Shell prep: Keep the dough cool and handle it as little as possible. Cold dough bakes into crisper edges, which is exactly what you want for a good cannoli shell. If the dough crackles when you roll it, you’re on the right track—that’s a sign you’ve got enough moisture balance.
Mixing technique: Don’t overwork the batter. A few quick folds and you’re done. Overmixing will toughen the shells, and nobody wants a chewy shell in a bite-sized cup. If you’re worried about texture, rest the dough 10 minutes before rolling; the gluten relaxes and you’ll get better flaking.
Swirl customization: The marbled filling is a playful touch that doesn’t require much. Fold a teaspoon of melted dark chocolate or espresso powder into a portion of the filling for a subtle contrast. You’ll get a beautiful swirl without sacrificing the creaminess.
Ingredient swaps: You can swap mascarpone for a few more tablespoons of ricotta for a lighter texture, or use Greek yogurt for a tangier note. If you want dairy-free cannoli cups, try a coconut ricotta and a dairy-free glaze. Textures shift slightly, but the concept remains delicious.
Baking tips: Position the tins in the middle rack for even heat. If your oven runs hot, rotate halfway through. For a deeper flavor, a touch of almond extract in the dough can elevate the nutty notes without overpowering the lemon.
Glaze variations: A vanilla glaze is classic, but you can switch to a citrus glaze with a bit of orange zest or a chocolate glaze for drama. If you want a less sweet finish, use a thin dip of melted White Chocolate then dust with finely chopped pistachios for color and texture.
My best lessons come from little missteps—like overfilling the cups and watching the filling spill over during baking, or forgetting to drain the ricotta and ending up with a wet filling. Those experiences taught me to taste as I go, to adjust sugar levels, and to always let the shells cool completely before filling. The result is a sturdier, cleaner presentation and a filling that holds its shape beautifully. Cannoli cups are a tiny project with major reward—the kind of thing that makes a simple night feel a lot more special.
Storing and Reheating Tips
To keep the texture and flavor intact, here are my go-to storage suggestions. You’ll want to prep the shells and filling separately if you’re planning to make them ahead.
Room Temperature: Shells can sit at room temperature for a few hours if you’re assembling just before a party. Keep the shells in an airtight container to prevent them from losing their crispness, and store the filling in a separate container to keep it fresh.
Refrigerator Storage: If you’re making the filling ahead, refrigerate it in an airtight container for up to 2 days. Bring it to room temperature and give it a quick whisk before filling the cups to restore smoothness.
Freezer Instructions: The shells freeze well if wrapped tightly. Reheat directly in a 325°F (165°C) oven for 6–8 minutes to crisp them again before filling. The filling doesn’t freeze and thaw as gracefully, so I recommend freezing only the shells and filling them fresh when you’re ready to serve.
Glaze Timing Advice: If you’re planning to freeze shells, skip glazing until you’re ready to serve. Glaze can soften shells over time. If you’re storing filled cups, glaze just before serving for the best shine and texture.
In practice, I like to bake a fresh batch of shells, freeze them, and then fill and glaze on the day I’m serving. It keeps everything crisp and bright and avoids sogginess that can creep in with dairy fillings. The first time you do it this way, you’ll taste how the texture holds up and how the flavors stay vibrant.
Frequently Asked Questions
Final Thoughts
These cannoli cups aren’t just a dessert; they’re a little ritual I keep in my back pocket for when I want to feel like I’ve pulled off a show-stopper without staying in the kitchen for hours. The shells offer enough crunch to contrast with the soft, creamy filling, and the lemon zest keeps the entire bite bright and balanced. I’ve watched friends and family close their eyes for that first bite and exhale with a satisfied, content smile. Trust me on this one: you’ll be hooked after the first tray disappears, and you’ll start hearing “Can you make cannoli cups again soon?” more than you expect. If you try any flavor twists—like orange zest, dried cherries, or a pistachio crumble on top—drop a note in the comments. I love hearing what people come up with. Happy baking, friends, and may your cannoli cups bring a little extra sweetness into your day!

Cannoli Cups
Ingredients
For the Cups:
- 1.5 cups all-purpose flour
- 0.25 cups granulated sugar
- 0.25 teaspoon salt
- 0.375 cup unsalted butter, cold and cubed
- 2 tablespoon ice water
For the Filling:
- 15 ounces ricotta cheese, whole milk, drained very well
- 0.5 cup powdered sugar
- 1 teaspoon vanilla extract
- 0.25 cup mini chocolate chips
- 0.25 cup candied orange peel, finely chopped (optional)
Instructions
Preparation Steps
- Preheat oven to 375°F (190°C). Grease and flour a mini muffin tin.
- In a medium bowl, whisk together the flour, granulated sugar, and salt.
- Cut in the cold butter using a pastry blender or your fingertips until the mixture resembles coarse crumbs.
- Gradually add the ice water, 1 tablespoon at a time, mixing until the dough just comes together. Do not overmix.
- Turn the dough out onto a lightly floured surface and gently form it into a disc. Wrap in plastic wrap and chill for at least 30 minutes.
- Roll out the chilled dough to about 1/8-inch thickness. Use a round cookie cutter (about 2.5 inches in diameter) to cut out circles.
- Gently press each circle of dough into the greased mini muffin cups, pressing it up the sides.
- Bake for 12-15 minutes, or until golden brown and slightly puffed. Let cool in the tin for a few minutes before transferring to a wire rack to cool completely.
- While the cups are cooling, prepare the filling. In a medium bowl, combine the drained ricotta cheese, powdered sugar, and vanilla extract. Mix until smooth.
- Gently fold in the mini chocolate chips and chopped candied orange peel (if using).
- Once the cannoli cups are completely cooled, spoon or pipe the filling into them. Garnish with extra chocolate chips or a dusting of powdered sugar if desired.


