


Oh, friends, I have a recipe for you today that feels like a warm hug and a whispered secret all at once. It’s the kind of treat that makes a dreary Tuesday feel like a holiday morning, and honestly, it’s what I dream about when that first chill hits the air. We’re talking about a candy cane danish, but not just any candy cane danish. This is the one that has my family practically doing a happy dance every time it graces our kitchen counter. It’s that perfect balance of flaky, sweet, and wonderfully festive. Think of it as a little slice of Christmas magic, anytime you need it. Honestly, if you’ve ever loved a classic Cinnamon Roll or a danish pastry from your favorite bakery, prepare to be utterly charmed. This candy cane danish takes all those cozy feelings and elevates them with that unmistakable pepperminty swirl. I’ve tinkered with this recipe for years, trying to capture that melt-in-your-mouth texture and perfectly balanced sweetness. And I finally, *finally* landed on something truly special. It’s surprisingly simple, too, which is always a huge win in my book, especially when I’m juggling a million things and still want to whip up something incredible.

What is candy cane Danish?
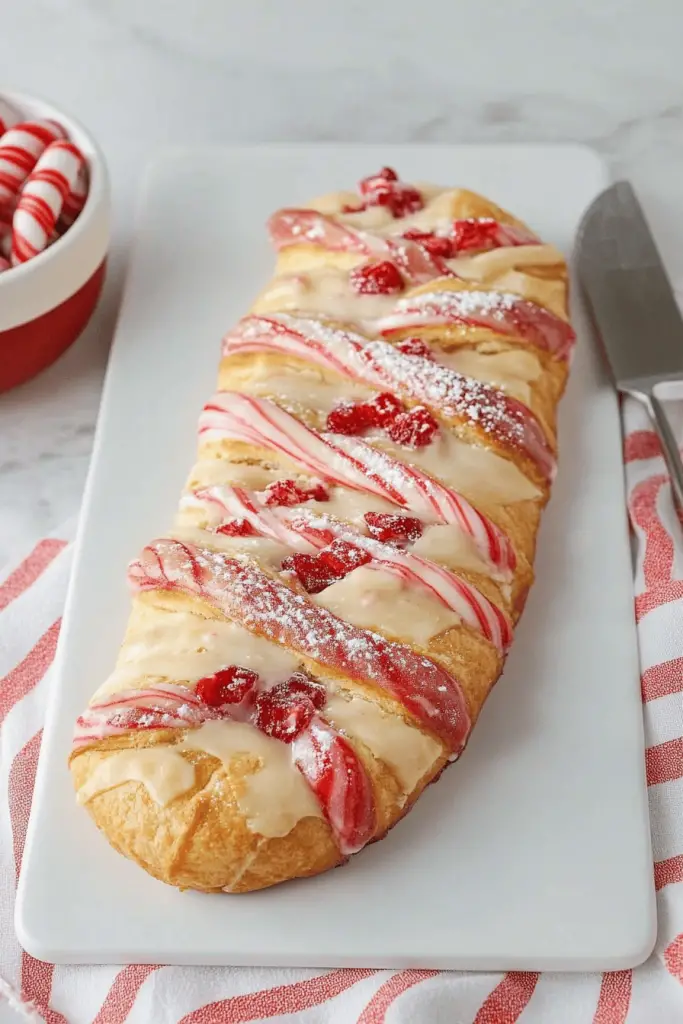
So, what exactly *is* this delightful treat we’re diving into? Well, picture this: a rich, slightly sweet pastry dough that’s incredibly tender and flaky, swirled with a vibrant, peppermint-infused filling, and then finished with a sweet, glossy glaze. It’s basically a dream come true for anyone who loves a good pastry, especially with a festive twist. The “candy cane” part comes from that iconic red and white swirl, achieved by using a touch of red food coloring in a portion of the filling and then artfully swirling it through. It’s not just for show, though; the peppermint flavor is subtle but definitely there, giving it that unmistakable holiday cheer without being overpowering. It’s a bit like a deconstructed peppermint bark meets a danish pastry, all wrapped up in one glorious bite. It’s the kind of dessert that feels fancy enough for guests but is absolutely perfect for a quiet morning coffee too. It’s not overly complicated, despite looking quite elegant once it’s done. Think of it as a more whimsical, delightful cousin to your typical breakfast pastry.
Why you’ll love this recipe?
There are so many reasons why I just know you’re going to fall head over heels for this candy cane danish recipe. For starters, the flavor is just out of this world. That combination of tender, buttery pastry with the sweet, slightly tangy peppermint filling? It’s a match made in heaven. The peppermint isn’t sharp; it’s more of a gentle, refreshing note that perfectly complements the sweetness. And the texture! Oh, the texture. It’s so wonderfully flaky and light, it practically dissolves on your tongue. It’s like biting into a little cloud of deliciousness. What I also adore is how surprisingly simple it actually is to make. When you see these beautiful swirls, you might think it’s a super complicated, time-consuming endeavor, but trust me, it’s totally manageable for any home baker. The ingredients are all pretty standard pantry staples, too, so you won’t have to hunt down anything too obscure. Plus, it’s incredibly cost-efficient. Making these at home will cost you a fraction of what you’d pay at a fancy bakery, and you get that wonderful satisfaction of creating something delicious from scratch. And talk about versatility! While it’s a natural fit for Christmas and the holiday season, I’ve found myself making these for birthdays, special brunches, or even just when I need a little pick-me-up. They’re also incredibly forgiving. If your swirls aren’t perfectly uniform, it really doesn’t matter; it just adds to the rustic charm. Compared to a complicated puff pastry, this dough comes together so much more easily, making the whole process feel less daunting. It’s the kind of recipe that makes you feel like a baking superstar without all the fuss. Honestly, the smell that fills your house while these are baking is a reward in itself!
How do you make Danish candy cane?
Quick Overview
Making these delightful candy cane danishes is a straightforward process, really. You’ll whip up a simple, tender dough, prepare a sweet peppermint filling, artfully swirl them together for that signature look, bake until golden, and then finish with a drizzle of sweet glaze. It’s all about layering those simple steps to create something truly spectacular. The beauty lies in its simplicity and the visual appeal that comes from that lovely swirl. You get that impressive presentation without needing a culinary degree, making it perfect for both beginners and experienced bakers looking for a fun, festive treat.
Ingredients
For the Main Batter:
This dough is designed to be tender and easy to work with, giving you that lovely flaky texture without all the fuss of traditional laminated doughs. I always use good quality unsalted butter for the richest flavor, but a good quality salted butter can work too, you might just need to adjust the salt slightly. Make sure your eggs are at room temperature; it helps them incorporate much better into the batter, leading to a smoother, more cohesive dough. And for the flour, all-purpose is perfect here. I’ve tried cake flour, and it can make it a bit *too* delicate sometimes, so stick with the regular stuff.
- 3 cups all-purpose flour, plus more for dusting
- 1 teaspoon baking powder
- 1/2 teaspoon salt
- 1 cup (2 sticks) unsalted butter, softened
- 1 1/2 cups granulated sugar
- 2 large eggs, room temperature
- 1 teaspoon vanilla extract
- 1/2 cup milk (whole milk or 2% works best for richness)
For the Filling:
This is where the magic happens, creating that beautiful swirl and burst of peppermint flavor. You want the Cream Cheese to be completely softened so there are no lumps. I find that letting it sit out for at least an hour, or gently microwaving it for short bursts (15-20 seconds at a time), does the trick. For the peppermint extract, start with the amount listed, but always have a tiny bit more on hand in case you want a stronger punch. A little goes a long way! And the red food coloring is crucial for that classic candy cane look. Gel food coloring is best as it’s more concentrated and won’t water down your filling.
- 8 ounces cream cheese, softened
- 1/2 cup powdered sugar
- 1 teaspoon peppermint extract
- 1-2 drops red gel food coloring
For the Glaze:
A simple glaze ties everything together, adding a touch more sweetness and a beautiful sheen. The key here is the consistency. You want it pourable but not watery. If it’s too thick, add milk or water a teaspoon at a time. If it’s too thin, add a tablespoon more of powdered sugar. This is also where you can add a tiny touch more peppermint extract if you like it really minty!
- 1 cup powdered sugar
- 2-3 tablespoons milk or heavy cream
- 1/4 teaspoon vanilla extract (optional)
- A tiny pinch of peppermint extract (optional)

Step-by-Step Instructions
Step 1: Preheat & Prep Pan
First things first, let’s get your oven ready. Preheat it to 350°F (175°C). While that’s heating up, grab a large baking sheet. I like to line mine with parchment paper. This is a lifesaver for easy cleanup and ensures your danishes don’t stick. If you don’t have parchment, a lightly greased baking sheet will do in a pinch, but parchment is definitely my preference for this recipe.
Step 2: Mix Dry Ingredients
In a medium bowl, whisk together the flour, baking powder, and salt. Just give it a good whisk until everything is evenly combined. This ensures your baking powder is distributed properly, which helps the danishes rise beautifully. Don’t overthink this step; a quick whisk is all you need.
Step 3: Mix Wet Ingredients
In a large bowl, using an electric mixer (a stand mixer with a paddle attachment is ideal, but a hand mixer works just fine!), cream together the softened butter and granulated sugar until light and fluffy. This usually takes about 3-4 minutes. Then, beat in the eggs one at a time, making sure each is fully incorporated before adding the next. Stir in the vanilla extract. It should look smooth and creamy.
Step 4: Combine
Now, we’ll add the dry ingredients and the milk to the wet ingredients. Add about half of the dry ingredients to the butter mixture and mix on low speed until just combined. Then, add the milk and mix until it’s just incorporated. Finally, add the remaining dry ingredients and mix until the dough just comes together. Be careful not to overmix here! Overmixing can lead to tough pastries, and we want tender, flaky goodness. The dough will be soft but manageable.
Step 5: Prepare Filling
In a separate bowl, beat the softened Cream Cheese until it’s smooth and creamy. Add the powdered sugar and beat until well combined and no lumps remain. Stir in the peppermint extract. Now, divide the filling into two equal portions. To one portion, add 1-2 drops of red gel food coloring and stir until you have a uniform, pretty pink color. Be conservative with the food coloring; you can always add more if you want a deeper shade.
Step 6: Layer & Swirl
Lightly flour your work surface. Turn the dough out onto the floured surface and gently pat it into a rectangle, about 10×12 inches. Spread the plain Cream Cheese filling evenly over the dough, leaving about a 1-inch border along one of the long edges. Then, dollop spoonfuls of the red filling randomly over the plain filling. Using a toothpick or a small knife, gently swirl the two fillings together to create a marbled effect. Don’t over-swirl; you want to see distinct red and white ribbons. Once swirled, carefully roll the dough up tightly from the long edge that has filling all the way to it (the one without the border). Pinch the seam to seal it. Cut the rolled log into 12 equal slices, about 1-inch thick. You can gently shape them into a more rounded danish shape if you like, or leave them as cute pinwheels. Place them on your prepared baking sheet, leaving a little space between each one.
Step 7: Bake
Bake for 20-25 minutes, or until the edges are lightly golden brown and the centers are set. Keep an eye on them towards the end; ovens can vary, and you don’t want them to get too dark. They should smell absolutely amazing! If you’re unsure if they’re done, you can gently touch the center; it should spring back slightly.
Step 8: Cool & Glaze
Once baked, remove the danishes from the oven and let them cool on the baking sheet for about 5-10 minutes. Then, carefully transfer them to a wire rack to cool completely. While they’re cooling, whisk together the glaze ingredients in a small bowl. Start with 2 tablespoons of milk and add more only if needed to reach a drizzly consistency. Once the danishes are completely cool, drizzle the glaze generously over the tops. Let the glaze set for about 15-20 minutes before serving.
Step 9: Slice & Serve
And there you have it! Beautiful, homemade candy cane danishes. They are best served fresh, but they hold up well for a day or two. You can slice them with a serrated knife for a clean cut through the flaky layers. Serve them warm or at room temperature. They’re perfect as is, or you can enjoy them with a cup of coffee or tea. The swirls look so pretty when you cut into them!
What to Serve It With
These candy cane danishes are so wonderfully versatile, they can truly grace any table, any time of day. For a classic breakfast, they are absolutely divine with a hot mug of coffee – I personally love a good dark roast that can stand up to the sweetness. You could also pair them with a creamy latte or even a festive eggnog if you’re feeling extra celebratory. For a more elaborate brunch spread, these danishes are stars! Arrange them on a tiered stand alongside fresh fruit salad, mini quiches, and perhaps some smoked salmon. They add that touch of elegance and festivity without demanding too much attention. A sparkling mimosa or a fresh-squeezed orange juice makes the perfect beverage pairing. If you’re serving these as a dessert, which is a fantastic idea, they’re wonderful after a hearty meal. Imagine them alongside a scoop of vanilla bean Ice Cream or a dollop of whipped cream. A warm cup of herbal tea or a small glass of port wine would be lovely accompaniments. And for those cozy snack moments? These are perfect! Just grab one (or two!) with a glass of cold milk. My kids always go for the milk with these. It’s like a grown-up version of a favorite childhood treat. I’ve even served them with a side of Greek yogurt and berries for a slightly more balanced, but still indulgent, late-night snack. They truly fit any occasion you can dream up!
Top Tips for Perfecting Your Candy Cane Danish
Over the years, I’ve learned a few little tricks that make this candy cane danish recipe even better, and I’m happy to share them with you! First off, when it comes to prepping the dough, don’t be afraid to get a little flour on your hands. A lightly floured surface is key to preventing sticking, but try not to add too much extra flour to the dough itself, as this can make it dry. If the dough feels sticky, just add a tiny bit more flour at a time. For the filling, ensure your cream cheese is *truly* softened. If it’s even a little firm, you’ll end up with lumps, and nobody wants that. A quick zap in the microwave can help, but watch it closely so it doesn’t melt. When you’re swirling the fillings, the less you do, the more defined your candy cane stripes will be. I used to get carried away with swirling, and all I ended up with was a uniform pinkish-white mass! So, gentle strokes with a toothpick are your friend here. For baking, always keep an eye on your oven. If your oven tends to run hot, you might want to reduce the temperature slightly or shorten the baking time. I’ve found that using the middle rack gives the most even results. And for that beautiful glaze, consistency is key. It should be thick enough to coat the danishes without running off completely, but thin enough to drizzle easily. I usually start with 2 tablespoons of milk and add more in tiny increments until it’s just right. If you want an extra peppermint kick, a tiny touch more extract in the glaze is lovely, but be careful not to go overboard. Sometimes, I’ll even add a sprinkle of crushed candy canes on top of the wet glaze for an extra festive touch – it looks and tastes amazing! Don’t be discouraged if your first batch isn’t “perfect.” Every oven and every batch of ingredients can be a little different. The most important thing is to have fun and enjoy the process. These danishes are meant to be a joy to make and even more of a joy to eat!
Storing and Reheating Tips
Now, about keeping these beauties fresh. If you happen to have any leftovers (which is rare in my house!), they are best stored at room temperature. I like to place them in an airtight container, and they’ll stay wonderfully fresh for about 1-2 days. Just make sure they’ve cooled completely before sealing the container, otherwise, you’ll get condensation, and nobody wants soggy danishes! If you’re planning to keep them for longer than a couple of days, the refrigerator is your best bet. Pop them into an airtight container or wrap them tightly in plastic wrap, and they should be good for up to 4-5 days. The glaze might soften a bit in the fridge, but the flavor will still be there. When you’re ready to enjoy them from the fridge, you can either eat them cold, or if you prefer them warm, I have a little trick. Pop them on a baking sheet in a low oven (around 300°F or 150°C) for about 5-7 minutes, just until they’re warmed through. They’ll regain a bit of that fresh-baked tenderness. For longer storage, freezing is definitely an option. You can freeze the unfrosted danishes for up to 2-3 months. Make sure they are completely cooled, then wrap each one individually in plastic wrap, and then place them in a freezer-safe bag or container. To thaw, simply take them out of the freezer and let them thaw at room temperature. You can then add the glaze once they’re thawed and at room temperature, or re-glaze them if you prefer. If you’ve already glazed them before freezing, you might find the glaze is a little softer upon thawing, so you could add a fresh drizzle if you like! I usually recommend adding the glaze *after* storing or reheating to maintain its best texture and appearance.
Frequently Asked Questions
Final Thoughts

So there you have it, my friends! A recipe that I truly believe will bring a little extra sparkle and sweetness into your kitchen. This candy cane danish is more than just a dessert; it’s a feeling. It’s that joy of creating something beautiful and delicious with your own hands, the anticipation as it bakes, and the pure delight when you take that first bite. It’s the perfect blend of comforting familiarity and festive fun, and I just know you’re going to love it. If you’re a fan of this recipe, you might also enjoy my recipe for [Link to another relevant recipe, e.g., Peppermint Brownies or Holiday Sugar Cookies] for more festive baking inspiration! I can’t wait to hear all about your candy cane danish adventures. Did you add any extra swirls? Did your family devour them as quickly as mine does? Please leave a comment below and tell me how they turned out, or share your own delicious variations. Happy baking, and enjoy every single flaky, pepperminty bite!
Candy cane danish
Ingredients
Main Ingredients
- 1 package puff pastry thawed
- 226.8 grams cream cheese softened
- 0.5 cup granulated sugar
- 1 teaspoon vanilla extract
- 1 large egg yolk
- 0.5 cup peppermint chips or chopped candy canes
- 0.5 cup powdered sugar
- 1 tablespoon milk
- 0.5 teaspoon peppermint extract
Instructions
Preparation Steps
- Preheat oven to 400°F (200°C). Line a baking sheet with parchment paper.
- Unroll the puff pastry sheets and cut each into 4 equal rectangles.
- In a medium bowl, beat together the cream cheese, granulated sugar, vanilla extract, and egg yolk until smooth.
- Spread a thin layer of the cream cheese mixture onto each puff pastry rectangle, leaving a small border.
- Sprinkle the peppermint chips over the cream cheese mixture.
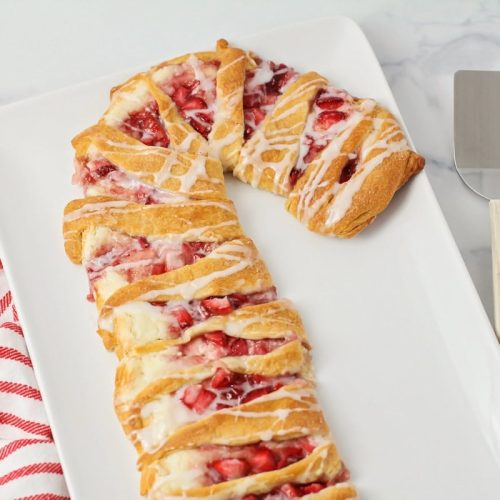
- Cut each rectangle in half diagonally to create two triangles. Starting from the wide base, roll up each triangle towards the point, then gently bend into a candy cane shape.
- Place the shaped danishes on the prepared baking sheet.
- Bake for 12-15 minutes, or until golden brown and puffed.
- While the danishes are baking, whisk together the powdered sugar, milk, and peppermint extract in a small bowl to create a glaze.
- Let the danishes cool slightly on the baking sheet before transferring them to a wire rack. Drizzle with the peppermint glaze.


