


Oh, friend, let me tell you about a little slice of heaven that’s been gracing our dessert table for years. It all started one blustery autumn evening when a sudden craving for s’mores hit, but the thought of building a bonfire in the backyard felt… ambitious. Especially with two little ones begging for something gooey and chocolatey. That’s when my husband, bless his creative heart, looked at me and said, “What if we put it all in a pie?” And just like that, the idea for the ultimate smores pie was born. Forget soggy graham crackers and burnt marshmallows; this is the pure essence of that beloved campfire treat, elevated into a ridiculously easy, utterly delicious pie that honestly tastes like pure joy. It’s got that crunchy graham cracker crust, a silky smooth chocolate ganache, and a cloud of fluffy toasted marshmallow on top. If you love a good chocolate cream pie but wish it had that playful, smoky kiss of a campfire, you’re in for a real treat with this one. Trust me, it disappears faster than a marshmallow over an open flame!
What is a S’mores Pie?
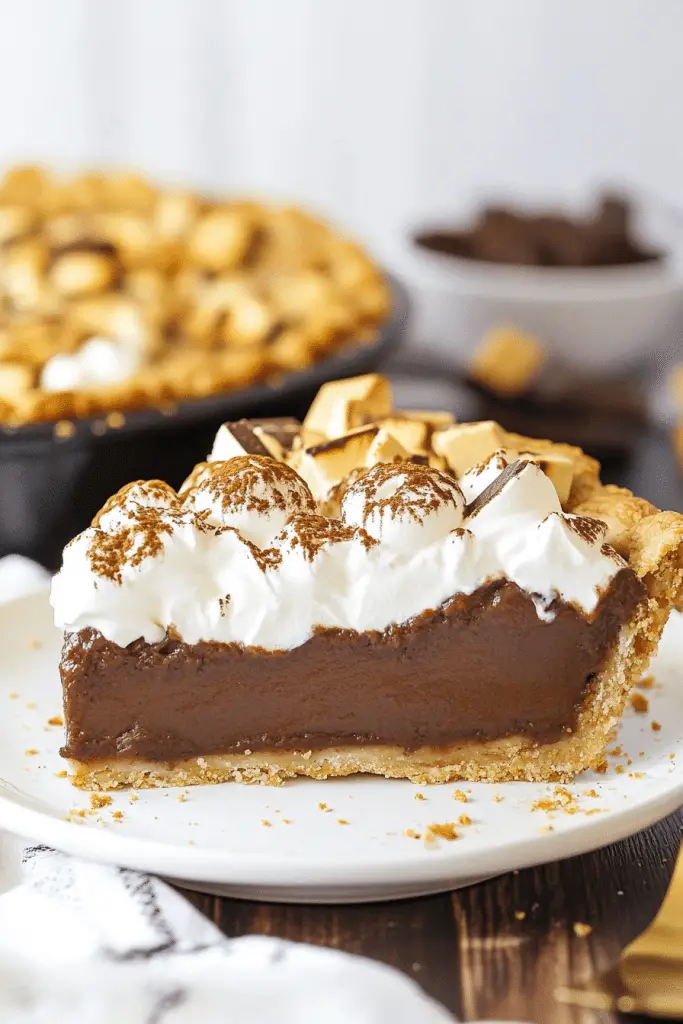
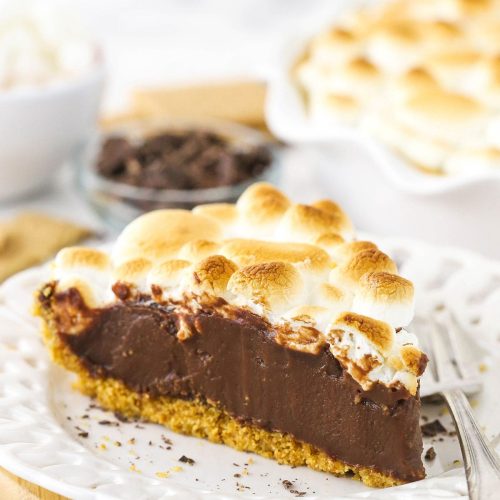
At its heart, this s’mores pie is a deconstructed, refined, and entirely more manageable version of our favorite childhood campfire dessert. Think of it as taking all the best bits of s’mores – the crunchy graham cracker, the melty chocolate, and the toasted marshmallow – and layering them into a decadent, easy-to-slice pie. It’s essentially a no-bake chocolate pie with a dramatic, glorious marshmallow topping that you can toast to perfection right in your own kitchen, no smoky clothes required! The name really says it all: it’s s’mores, in a pie. It’s that warm, nostalgic hug of a treat without any of the outdoor fuss. My kids actually call it “campfire in a crust,” and honestly, they’re not wrong. It captures every single delightful texture and flavor of the classic, all in one glorious, shareable (or not, no judgment here!) dessert.
Why you’ll love this recipe?
Why is this so?smores pie has become a staple in my kitchen, and why I just know you’re going to fall head over heels for it too. What I love most about this is how it delivers on flavor without demanding hours of your precious time.
- What is that one flavor that makes your eyes roll back? Seriously, the combination of the buttery, slightly salty graham cracker crust with the rich, intense chocolate ganache and that sweet, airy, perfectly toasted marshmallow? It’s pure magic. Every bite is a journey through different textures and perfectly balanced sweetness. It’s got that classic s’mores charm, but in a way that feels utterly gourmet.
- Simplicity is key, my friend: We’re talking mostly no-bake here! The crust comes together in a flash, the chocolate layer is just a quick melt-and-pour, and the marshmallow topping is incredibly forgiving. It’s one of those recipes that looks incredibly impressive but is secretly a breeze to whip up. I always make this one when I need a showstopper dessert but I’m short on time.
- Budget-friendly goodness: All the ingredients are readily available at your local grocery store and won’t break the bank. Graham crackers, chocolate chips, butter, and marshmallows – common pantry staples transformed into something extraordinary. It’s a lifesaver on busy nights when you need a dessert without a trip to a specialty store.
- Versatility for every occasion: While it screams “summer campfire,” this smores pie is perfect any time of year. It’s fantastic for a backyard BBQ, a cozy movie night in, a holiday gathering, or even just when you’re craving something sweet at 10 pm. It’s a wonderful alternative to a heavier chocolate cake or a complicated tart, offering a delightful lightness that still feels incredibly satisfying. I’ve served it alongside fresh berries for a lighter touch, or with a scoop of vanilla bean ice cream for pure indulgence. It truly stands out!
How to Make This S’mores Pie
Quick Overview
Alright, let’s get down to the delicious details! Making this smores pie is surprisingly straightforward, and I promise, you don’t need to be a pastry chef to nail it. We’re going to build this beauty in three simple layers: a crunchy graham cracker crust, a silky smooth chocolate ganache filling, and a fluffy, toasted marshmallow topping. The genius of this method is that it’s mostly no-bake, saving you oven time and stress. The only “baking” involves a quick toasting of the marshmallows, which is both fun and utterly satisfying to watch. It’s a quick trip to dessert heaven, and the results are consistently amazing – perfect for when you want maximum impact with minimal effort!
Ingredients
For the Crispy Graham Cracker Crust:
- 1 ½ cups (about 10-12 full sheets) graham cracker crumbs: You can buy these pre-crushed, but I always prefer to crush my own for a fresher taste and a bit more texture. Just pulse them in a food processor or place in a zip-top bag and smash with a rolling pin.
- ¼ cup granulated sugar: Just enough to add a touch of sweetness without being overpowering.
- 6 tablespoons unsalted butter, melted: Use good quality butter here; it really makes a difference in the crust’s flavor and helps it hold together beautifully.
For the Rich Chocolate Ganache Filling:
- 1 ½ cups (about 9 ounces) good quality chocolate chips: I usually go for semi-sweet, but dark chocolate works beautifully if you prefer a less sweet pie. Milk chocolate can be a bit too sweet with the marshmallows, but if that’s your jam, go for it!
- 1 cup heavy cream: This creates that luscious, smooth ganache texture. Don’t skimp on the fat content here!
- 2 tablespoons unsalted butter, softened: Added at the end for extra silkiness and shine.
- 1 teaspoon vanilla extract: Pure vanilla, please! It really enhances the chocolate flavor.
- Pinch of salt: Always, always, always add a tiny pinch of salt to chocolate to make it sing. Trust me on this one!
For the Fluffy Toasted Marshmallow Topping:
- 5 cups (about 10 ounces) mini marshmallows OR 4 cups (about 10 ounces) large marshmallows, cut in half: Mini marshmallows spread out beautifully, but large ones give you those big, dramatic toasty peaks. Your choice!
Step-by-Step Instructions
Step 1: Preheat & Prep Pan
If you’re planning to toast your marshmallows under the broiler, go ahead and adjust your oven rack to the top position (about 6 inches from the heat source). Preheat your broiler on high. Meanwhile, grab a 9-inch pie plate. No need to grease it; the butter in our crust will do all the work. It’s all about setting ourselves up for success from the get-go!
Step 2: Mix Dry Ingredients for the Crust
In a medium bowl, combine your graham cracker crumbs and the granulated sugar. Give them a good stir with a fork until they’re evenly mixed. You want to make sure the sugar is distributed so you don’t get any overly sweet spots in your crust. This is pretty straightforward, but a crucial foundation for our amazing smores pie!
Step 3: Mix Wet Ingredients for the Crust
Pour your melted butter directly into the graham cracker mixture. Use a fork or a spatula to mix until all the crumbs are moistened and resemble wet sand. This is where the magic happens – the butter acts as the binder, ensuring a perfectly crumbly yet cohesive crust. If it feels too dry, add a tiny bit more melted butter, a teaspoon at a time, until it clumps together when squeezed.
Step 4: Form the Crust
Press the buttered graham cracker mixture evenly into the bottom and up the sides of your pie plate. I like to use the bottom of a flat-bottomed measuring cup to really pack it in tightly. This helps create a sturdy crust that won’t crumble when you slice into your smores pie. Pop the crust into the freezer for at least 15 minutes to firm up while you make the chocolate filling. This step is a lifesaver for ensuring a crisp, stable base.
Step 5: Prepare the Chocolate Ganache Filling
Place your chocolate chips in a heatproof bowl. In a small saucepan, heat the heavy cream over medium heat until it just begins to simmer around the edges – don’t let it boil vigorously! Pour the hot cream directly over the chocolate chips. Let it sit undisturbed for 5 minutes; this allows the chocolate to melt slowly and evenly. After 5 minutes, add the softened butter, vanilla extract, and pinch of salt. Whisk gently from the center outwards until the mixture is completely smooth, shiny, and luscious. Be patient here; it might look separated at first, but keep whisking, and it will come together beautifully.
Step 6: Layer the Pie
Pour the warm chocolate ganache filling into your chilled graham cracker crust. Use an offset spatula or the back of a spoon to spread it out evenly. Give the pie plate a few gentle taps on the counter to release any air bubbles and ensure a perfectly smooth top. Now, pop the pie into the refrigerator for at least 2-3 hours, or until the chocolate filling is firm enough to support the marshmallow topping. This chilling time is essential for the smores pie to set properly.
Step 7: Toast the Marshmallows
Once your chocolate filling is firm, arrange the marshmallows evenly over the top of the pie. If using large marshmallows, make sure the cut sides are facing down for better stability. Carefully place the pie under the preheated broiler. Keep a very, very close eye on it! Marshmallows can go from perfectly golden to burnt in seconds. Broil for 30 seconds to 2 minutes, rotating the pie plate if necessary, until the marshmallows are beautifully golden brown and lightly charred in spots, just like they’ve been kissed by a campfire. Alternatively, if you have a kitchen torch, you can torch the marshmallows until golden and bubbly for more control.
Step 8: Cool & Serve
Remove the pie from the oven (or put away your torch) and let it cool on a wire rack for about 10-15 minutes. This allows the marshmallows to settle slightly and prevents them from sticking excessively to your knife when slicing. The aroma in your kitchen right now will be absolutely heavenly – a sure sign of a perfectly toasted smores pie!
Step 9: Slice & Serve
For the cleanest slices, use a sharp, thin knife dipped in hot water and wiped clean between each cut. This helps prevent the sticky marshmallows from dragging. Serve your smores pie at room temperature or slightly chilled. It’s best enjoyed the day it’s made when the marshmallows are still wonderfully fresh and soft, but leftovers are still pretty fantastic too!
What to Serve It With
This smores pie is truly a stand-alone star, but there are definitely ways to enhance the experience depending on when you’re enjoying it!
- For Dessert: This is where it truly shines! After a hearty meal, a slice of this s’mores pie is just what everyone craves. I love serving it with a tiny scoop of really good vanilla bean ice cream; the cool creaminess contrasts so beautifully with the toasted marshmallow and rich chocolate. A sprinkle of flaky sea salt on top before serving also brings out the chocolate even more. If you’re feeling fancy, a few fresh raspberries or sliced strawberries add a lovely touch of freshness and color. It’s the perfect ending to any dinner party or a special treat on a weeknight.
- For Brunch: While not a typical brunch item, I’ve absolutely served this at a more indulgent brunch spread, especially for a celebration. Paired with strong coffee or a mimosa, a smaller slice can be a delightful surprise. Think of it as a decadent “breakfast dessert” – it’s been a hit at our holiday brunches!
- For Cozy Snacks: This pie is pure comfort food, making it ideal for a cozy night in. There’s nothing better than snuggling up with a warm mug of hot cocoa or a glass of cold milk and a generous slice of s’mores pie. It’s my go-to when we’re having a family movie night, and it disappears in minutes. The smell alone brings everyone to the kitchen!
No matter the occasion, this pie brings a smile to everyone’s face. My kids actually ask for this all the time, sometimes even requesting it for their birthday “cake” instead of a traditional one!
Top Tips for Perfecting Your S’mores Pie
After making this smores pie countless times, I’ve picked up a few tricks that really elevate it from good to absolutely unforgettable. Here are my tried-and-true tips:
- Graham Cracker Crust Perfection: Don’t skimp on crushing the graham crackers! Finer crumbs mean a more cohesive crust. And when you press it into the pie plate, really use the bottom of a flat glass or measuring cup to pack it down firmly. This prevents a crumbly mess when you slice it later. I also learned that a tiny pinch of salt in the crust, though not in the original recipe, can truly make the butter and graham cracker flavors pop.
- Chocolate Layer Wisdom: Using good quality chocolate chips (even standard grocery store brands can be good if they’re semi-sweet) makes all the difference. For an extra rich flavor, try a mix of semi-sweet and dark chocolate. When you pour the hot cream over the chips, resist the urge to stir immediately! Letting it sit for those 5 minutes allows the residual heat to melt the chocolate completely, ensuring a super smooth ganache with no lumps. Adding the softened butter at the end gives it that incredible glossy finish and extra richness – it’s a pro move!
- Marshmallow Topping Mastery: This is where the fun truly begins! For that perfect, even toast, I prefer using mini marshmallows. They melt and brown more uniformly. If you’re using large marshmallows, cutting them in half gives you more surface area for toasting and makes them easier to arrange. When broiling, stay glued to your oven door! Marshmallows can go from perfectly golden to charcoal in mere seconds. If you have a kitchen torch, it offers the best control for getting those beautiful, toasty, caramelized spots exactly where you want them. Don’t be afraid to get a little char – that’s what makes it feel authentic to real s’mores!
- Ingredient Swaps & Variations: Want to switch things up? A chocolate cookie crust (like Oreos, crushed fine) instead of graham crackers is incredibly decadent. For the chocolate layer, you can experiment with different types of chocolate – milk chocolate for a sweeter pie, or even a hint of espresso powder to deepen the chocolate flavor. If you can’t find marshmallows, a meringue topping could be a fun, albeit different, twist (though it won’t be quite the same s’mores experience).
- Setting & Slicing Success: Don’t rush the chilling time! A properly set chocolate layer is key to clean slices. If you try to slice it too soon, the chocolate will ooze, and it won’t look as pretty. For super clean cuts, dip your knife in hot water and wipe it clean between each slice. This keeps the marshmallow from sticking and tearing, giving you those bakery-worthy slices.
These little adjustments truly make a world of difference. I’ve learned these tricks after years of making it, and they always result in the most perfect smores pie every single time!
Storing and Reheating Tips
So, you’ve made this incredible smores pie, and against all odds, you might have some leftovers! Don’t worry, it stores beautifully, though the marshmallow texture will change slightly over time.
- Room Temperature: This pie is absolutely best eaten the day it’s made, especially if the marshmallows have been freshly toasted. If you’ve just toasted it and are serving within a few hours, it can sit at room temperature, loosely covered, for up to 4-5 hours. The marshmallow will stay soft and slightly gooey, and the chocolate will be perfectly rich.
- Refrigerator Storage: For longer storage, cover the pie loosely with plastic wrap or aluminum foil and store it in the refrigerator for up to 3-4 days. Be aware that the marshmallows will firm up and lose a bit of their initial fluffiness, and they won’t be as soft and stretchy as when freshly toasted. The chocolate filling, however, will remain delicious and firm. If you’re planning to make it ahead, you can store the pie (chocolate layer only) in the fridge, then add and toast the marshmallows just before serving for the freshest experience.
- Freezer Instructions: If you want to really extend its life, you can freeze the pie (before adding marshmallows!) for up to 1 month. Wrap it tightly in several layers of plastic wrap, then a layer of aluminum foil. To thaw, unwrap and let it sit in the refrigerator overnight. Once thawed, you can then add and toast the marshmallows right before serving. I’ve found that freezing the full pie with toasted marshmallows isn’t ideal, as the marshmallows tend to become watery and lose their texture upon thawing.
- Reheating: Reheating a full slice with toasted marshmallows isn’t really recommended, as the marshmallows can become rubbery. However, if you have a slice with marshmallows that have firmed up in the fridge and you want that “just toasted” feel, you can quickly hit it with a kitchen torch for a few seconds. This brings back some of that gooey, warm goodness beautifully! Just be careful not to overdo it.
Frequently Asked Questions
Final Thoughts
Well, there you have it, my friends! This smores pie recipe is truly one of my all-time favorites, a testament to how simple ingredients can come together to create something truly magical. It’s got all the nostalgia of those beloved campfire nights, bottled up into a perfectly sliceable, unbelievably delicious dessert that always, always impresses. I love how easy it is to throw together, especially when you need a showstopper without all the fuss. Whether you’re sharing it with family and friends or secretly devouring a slice (or two!) on your own, it’s bound to bring a smile to your face. If you loved this, you might also enjoy my No-Bake Peanut Butter Pie or my Decadent Chocolate Lava Cakes. I truly hope you give this recipe a try and fall in love with it just as much as we have. Can’t wait to hear how yours turns out – please share your thoughts and any fun variations in the comments below! Happy baking (and no-baking)!
smores pie
Ingredients
Main Ingredients
- 1.5 cups graham cracker crumbs about 11 full sheet graham crackers
- 3 tbsp sugar
- 0.125 tsp salt
- 10 tbsp unsalted butter melted
- 5 tbsp cornstarch
- 1.25 cups sugar
- 0.25 tsp salt
- 4 large egg yolks
- 2 cups whole milk
- 0.5 cups heavy cream
- 6 oz semi-sweet chocolate chopped, 70% cocoa
- 2 tbsp unsalted butter
- 1 tbsp vanilla extract
- 7 regular sized marshmallows cut in half
- 2.5 cups mini marshmallows
Instructions
Preparation Steps
- Preheat oven to 325 degrees F.
- In a large bowl, combine graham cracker crumbs, sugar, and salt. Stir in melted butter until well combined and crumbly.
- Press the crumb mixture into the bottom and up the sides of a 9-inch deep dish pie pan.
- Bake the crust for 8 to 10 minutes. Remove from oven and let cool.
- In a medium saucepan, whisk together cornstarch, sugar, and salt.
- Add egg yolks, whole milk, and heavy cream. Whisk to combine.
- Heat mixture over medium heat, whisking constantly until it bubbles around the edges and thickens to a pudding-like consistency.
- Remove from heat and stir in chopped chocolate, butter, and vanilla extract until smooth and fully combined.
- Pour the chocolate filling into the cooled crust and smooth the top. Refrigerate for 5 to 6 hours or until firm.
- Preheat oven to 350 degrees F for topping.
- Arrange halved regular marshmallows around the top of the pie and fill in gaps with mini marshmallows.
- Bake for 3 to 4 minutes until marshmallows puff up. Then broil on low for 2 to 4 minutes until golden brown as desired.
- Serve warm for a gooey s’mores experience or chilled if preferred.
- Store covered in refrigerator. Reheat slices gently if desired, noting sticky marshmallows can be difficult to cut.


