


Oh, where do I even begin with this dessert? If you’re anything like me, the thought of a classic Boston cream pie is pure bliss. That rich, creamy custard filling tucked inside a moist cake, all topped with a luscious chocolate glaze… it’s just heavenly, right? But what if I told you there’s a way to take that already-perfect dessert and elevate it to an entirely new stratosphere? I’m talking about combining the iconic flavors of Boston cream pie with the decadent, dreamy texture of cheesecake. Yes, you heard me. Boston cream Pie Cheesecake. It sounds a little wild, I know, but trust me on this one. This isn’t just a mashup; it’s a harmonious marriage of two legendary desserts that results in something truly spectacular. My family begs for this recipe, and honestly, I can’t blame them. It’s become my go-to for special occasions, holiday gatherings, or even just those nights when you need a serious sweet treat to make everything feel right with the world. Forget baking a separate cake and making a cheesecake – this beauty does it all in one go, delivering that incredible Boston cream pie flavor in a format that’s both familiar and surprisingly new. It’s the kind of dessert that makes people ooh and aah before they even take their first bite.
What is Boston Cream Pie Cheesecake?
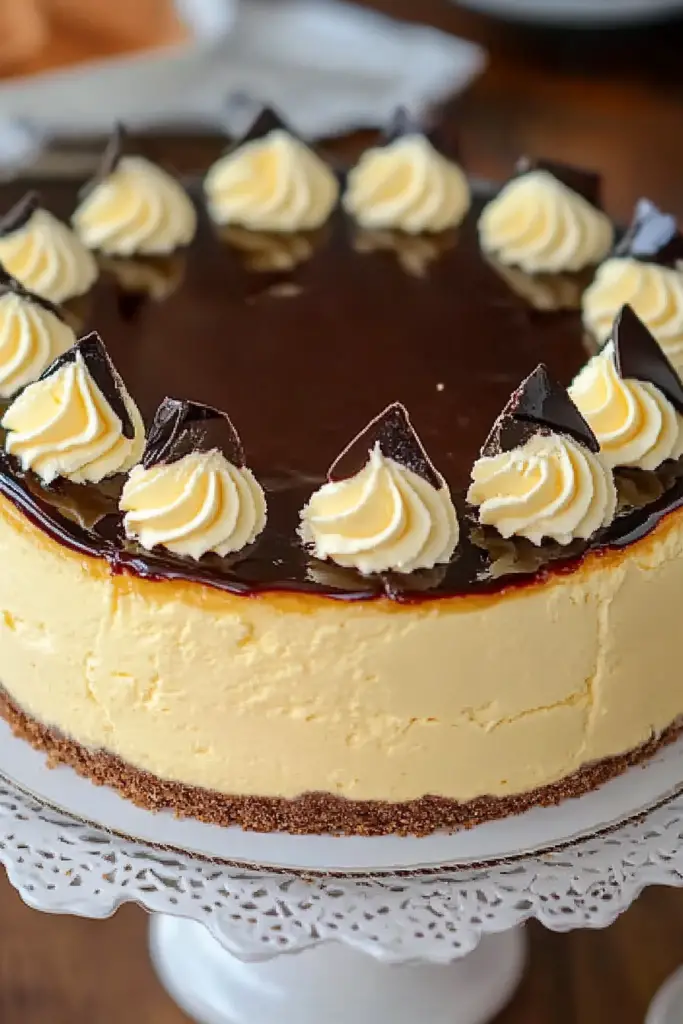
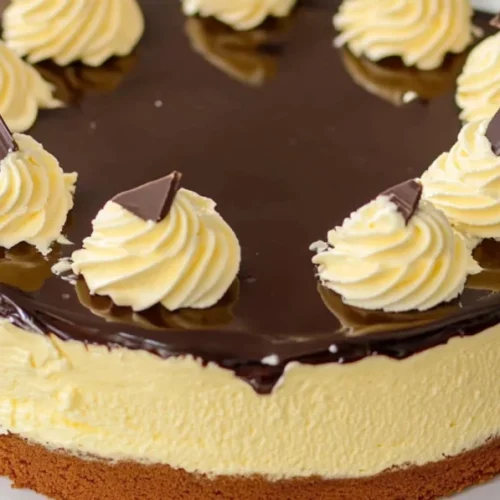
So, what exactly is this magical creation we’re diving into? Think of it as the best of both worlds, rolled into one irresistible dessert. At its heart, it’s a cheesecake – you know, that dense, creamy, tangy base that we all know and adore. But instead of a traditional graham cracker crust or a plain vanilla cake base, we’re building it on a delicate, cake-like foundation reminiscent of a classic Boston Cream pie. And the filling? Forget a plain vanilla cheesecake filling. We’re infusing it with that signature Boston cream pie custard flavor, often achieved with a luscious pastry cream or a rich vanilla bean custard. Then, to really seal the deal, we top it all off with a glossy, rich chocolate ganache, just like its pie namesake. It’s essentially a symphony of textures and flavors: the tender cake layer, the impossibly smooth and creamy cheesecake filling, and the decadent chocolate topping. It’s a dessert that pays homage to its roots while carving out its own glorious identity. It’s a bit of a showstopper, but don’t let that intimidate you – the concept is surprisingly straightforward and absolutely worth the effort.
Why you’ll love this recipe?
I could rave about this Boston Cream Pie cheesecake for hours, but let me try to break downflavor is just out of this world. You get that subtle, comforting sweetness from the cake layer, then the luxuriously rich, slightly tangy cheesecake filling that’s infused with that unmistakable vanilla custard taste. And that chocolate ganache? It’s the perfect bittersweet counterpoint. It’s a flavor profile that’s both familiar and exciting, hitting all the right notes for any dessert lover. And speaking of dessert lovers, this recipe is a lifesaver for anyone who, like me, sometimes struggles with deciding between a cake and a cheesecake. Now you don’t have to choose! The simplicity, once you get the hang of it, is also a huge win. While it has a few components, none of them are overly complicated. I’ve streamlined the process over the years, and I’m excited to share those little tricks with you. You might think a cheesecake with a cake layer sounds daunting, but this method is actually quite manageable. Plus, it’s incredibly cost-efficientWhat is the difference between buying a fancy dessert from a bakery and using pantry staplesversatility. While it’s fantastic as is, you can totally play around with it. Want a hint of coffee in your custard filling? Go for it! Prefer a darker chocolate ganache? Absolutely. This recipe is a fantastic base for personalization. What I love most about this Boston cream pie cheesecake is the sheer joy it brings. It’s a dessert that makes people feel special, that sparks conversation, and that leaves everyone asking for the recipe. It’s the perfect crowd-pleaser, whether you’re hosting a formal dinner party or just having a cozy night in. It’s truly a dessert that has it all!
How to Make Boston Cream Pie Cheesecake
Quick Overview
Making this Boston Cream Pie cheesecake involves three main stages: creating a tender cake base, preparing a luscious cheesecake filling with a custard twist, and finishing it all off with a decadent chocolate glaze. We’ll bake the cake layer first, then pour the cheesecake mixture over it and bake them together. Finally, once cooled, it’s drizzled with that signature chocolate ganache. It might sound like a few steps, but each one is straightforward and designed to build those incredible flavors and textures we’re aiming for. The beauty of this approach is that you get that classic Boston cream pie essence married perfectly with the creamy dreaminess of cheesecake in one stunning dessert. It’s truly the best of both worlds.
Ingredients
For the Cake Layer:
You’ll need all-purpose flour – about 1.5 cups. Make sure it’s fresh! A good quality all-purpose flour works wonders here. For leavening, we’ll use baking powder, 1.5 teaspoons, and a pinch of salt to balance the sweetness. For richness and moisture, unsalted butter, softened, about 1/2 cup, is key. You’ll also need granulated sugar, 1 cup, to sweeten it up. Then, two large eggs, at room temperature so they incorporate smoothly. And for that signature moistness and slight tang, we’ll use milk, about 1/2 cup, and a teaspoon of vanilla extract for that lovely aroma and flavor.
For the Cheesecake Filling:
The star of this show is, of course, Cream Cheese! You’ll need three 8-ounce blocks of full-fat cream cheese, softened to room temperature. This is crucial for a smooth, lump-free filling. We’ll add a bit more sugar, about 1 cup, to sweeten it. For that custard flavor, we’ll incorporate a couple of large eggs, again at room temperature, and a 1/4 cup of all-purpose flour to help stabilize the filling. A good dose of vanilla extract, 2 teaspoons, is essential for that classic taste. And for extra creaminess and that distinct custard vibe, we’ll stir in about 1/2 cup of heavy cream. Sometimes, I even add a tiny pinch of nutmeg – it’s optional but lovely!
For the Chocolate Glaze:
This is the grand finale! For a simple yet divine chocolate ganache, you’ll need good quality semi-sweet chocolate chips or chopped chocolate, about 6 ounces. And to make it smooth and pourable, heavy cream, about 1/2 cup, heated until just simmering. A tablespoon of butter adds a lovely sheen and extra silkiness. Some people like a tiny splash of coffee extract in their glaze, but I usually stick to just the chocolate and cream for that pure, unadulterated flavor.
Step-by-Step Instructions
Step 1: Preheat & Prep Pan
First things first, let’s get our oven ready. Preheat it to 350°F (175°C). Now, grab a 9-inch springform pan. This is your best friend for cheesecakes. Lightly grease the bottom and sides with butter or cooking spray. Then, for an extra layer of security against sticking and to ensure a beautiful presentation, I like to line the bottom with a circle of parchment paper. Just trace the bottom of the pan onto parchment, cut it out, and lay it in. This little step makes unmolding a breeze and saves you a potential headache later!
Step 2: Mix Dry Ingredients
In a medium bowl, whisk together your all-purpose flour (1.5 cups), baking powder (1.5 teaspoons), and salt (a pinch). Give it a good whisk until everything is evenly distributed. This ensures your cake layer will rise evenly and have a consistent texture. Don’t skip this step; it’s a simple but important foundation for a perfect cake base.
Step 3: Mix Wet Ingredients
In a separate, larger bowl, cream together your softened unsalted butter (1/2 cup) and granulated sugar (1 cup) until the mixture is light and fluffy. This usually takes a couple of minutes with an electric mixer. Then, beat in the two large eggs, one at a time, making sure each egg is fully incorporated before adding the next. Stir in the milk (1/2 cup) and vanilla extract (1 teaspoon). The mixture might look a little curdled at this stage, and that’s perfectly fine. It will come together when you add the dry ingredients.
Step 4: Combine
Now, it’s time to bring those wet and dry ingredients together. Gradually add the dry ingredients from Step 2 into the wet ingredients from Step 3. Mix on low speed or by hand until just combined. Be careful not to overmix here! Overmixing can develop the gluten too much and result in a tough cake layer. You want to mix until you no longer see streaks of flour. A few small lumps are okay. The batter should be thick but pourable.
Step 5: Prepare Filling
While your oven is preheating, let’s get the cheesecake filling ready. In a large bowl, beat the softened cream cheese (three 8-ounce blocks) until it’s completely smooth and creamy. This is where that room temperature cream cheese really shines. Gradually beat in the granulated sugar (1 cup) until well combined. Then, beat in the eggs (2 large) one at a time, just until incorporated. Stir in the flour (1/4 cup) and vanilla extract (2 teaspoons). Finally, gently mix in the heavy cream (1/2 cup). Don’t overbeat the filling once the eggs are in; you don’t want to incorporate too much air, which can lead to cracks.
Step 6: Layer & Swirl
Pour the cake batter you made in Step 4 into the prepared springform pan, spreading it evenly across the bottom. Then, gently and slowly pour the cheesecake filling over the cake batter. Try to pour it in the center and let it spread outwards. You don’t need to swirl this one; the contrast between the cake and the cheesecake layers will be distinct enough. The goal is to have a cake layer at the bottom and the creamy cheesecake on top.
Step 7: Bake
Place the springform pan on a baking sheet (this catches any potential drips). Bake in the preheated oven at 350°F (175°C) for about 55-65 minutes. The cheesecake is done when the edges are set but the center still has a slight jiggle, like pudding. It will continue to set as it cools. If the top starts to brown too quickly, you can loosely tent it with foil. Don’t overbake, or you’ll risk a dry cheesecake and cracks!
Step 8: Cool & Glaze
Once baked, turn off the oven, crack the oven door open slightly, and let the cheesecake cool in the oven for about an hour. This slow cooling process helps prevent cracks. After an hour, carefully remove the cheesecake from the oven and let it cool completely on a wire rack. Once it’s at room temperature, carefully run a thin knife around the edge of the pan before releasing the springform sides. Now, for the glaze: place your chocolate chips or chopped chocolate in a heatproof bowl. Heat the heavy cream in a small saucepan until it just begins to simmer around the edges. Pour the hot cream over the chocolate and let it sit for 5 minutes. Then, whisk until smooth and glossy. Stir in the butter until melted and incorporated. Let the glaze cool slightly until it’s thick enough to pour but still fluid. Drizzle it evenly over the top of your cooled cheesecake, letting it drip down the sides naturally. It’s a bit rustic and beautiful that way!
Step 9: Slice & Serve
For the best texture and flavor, chill the Boston cream pie cheesecake in the refrigerator for at least 4 hours, or preferably overnight. This allows the cheesecake to fully set and the flavors to meld beautifully. When you’re ready to serve, use a sharp knife dipped in hot water and wiped dry between each cut for clean, perfect slices. Serve chilled. It’s absolutely divine on its own, but a dollop of whipped cream never hurts!
What to Serve It With
This Boston cream pie cheesecake is so rich and complete on its own, but if you’re looking to round out a meal or create a truly special spread, here are some of my favorite pairings. For Breakfast, believe it or not, a small slice with a strong cup of coffee is pure heaven. The richness is tempered by the caffeine, and it feels like a decadent start to the day. I sometimes serve it with fresh berries – raspberries or strawberries add a lovely tartness that cuts through the sweetness. For Brunch, this cheesecake can be the star of the show! Serve it alongside lighter fare like fresh fruit salads, flaky croissants, or maybe even some mini quiches. For an elegant touch, a dusting of powdered sugar or a few fresh mint leaves can make it look extra special. And when serving it as Dessert, it truly shines. I love pairing it with a raspberry coulis for a vibrant contrast, or a dusting of cocoa powder. A small scoop of vanilla bean ice cream is also a classic, indulgent choice. For Cozy Snacks, a smaller slice with a warm mug of tea or hot chocolate is just the ticket on a chilly afternoon. My kids, bless their hearts, have been known to sneak a sliver after dinner with a glass of milk, and who can blame them? The key is that it’s versatile enough to be a showstopper or a comforting treat. It’s a dessert that fits every occasion!
Top Tips for Perfecting Your Boston Cream Pie Cheesecake
Over the years, I’ve learned a thing or two about making this Boston cream pie cheesecake sing. Here are my absolute must-know tips. For the cake prep, the biggest thing is not to overmix the batter once you add the dry ingredients. A few lumps are far better than a tough cake. Make sure your flour is fresh and properly measured (spoon and level it, don’t scoop directly from the bag!). For the mixing advice on the cheesecake filling, the absolute golden rule is softened, room-temperature ingredients – especially the cream cheese and eggs. This is non-negotiable for a smooth, velvety texture. Beat the cream cheese until it’s absolutely lump-free before adding anything else. And when you add the eggs, mix just until combined; overbeating at this stage introduces air that can cause cracks. Don’t be tempted to speed up the cooling process; the gradual cooling in the turned-off oven is a game-changer for preventing those dreaded cracks. When it comes to swirl customization, while this recipe doesn’t require it, if you were to ever want to swirl something into your cheesecake, remember to do it gently. Over-swirling can also lead to cracks. For ingredient swaps, if you find yourself out of heavy cream for the filling, full-fat sour cream can be a decent substitute, though it might make the cheesecake a bit tangier. For the glaze, if you don’t have heavy cream, a mix of half-and-half and butter can work in a pinch, but the texture won’t be quite as luxurious. When it comes to baking tips, the baking sheet underneath the springform pan is your best friend for catching any potential leaks. Also, ovens can vary wildly! My best advice is to know your oven. If you know it runs hot, consider lowering the temperature slightly. And the jiggle test for doneness is more reliable than a strict time frame. If you have a thermometer, the center should read around 150-155°F (65-68°C). For glaze variations, feel free to experiment! A touch of espresso powder in the glaze can add a lovely depth. Or, a sprinkle of flaky sea salt on top of the warm glaze is divine. The key is patience; let the glaze cool just enough so it doesn’t melt off the cheesecake but is still pourable.
Storing and Reheating Tips
One of the best things about this Boston cream pie cheesecake is how well it keeps, making it perfect for making ahead of time. For room temperature storage, I generally don’t recommend leaving it out for more than two hours, especially if it’s warm in your kitchen. The cheesecake itself is more forgiving, but the custard-like filling can spoil. If you need to store it at room temp for a short while before serving, just cover it loosely with plastic wrap or a cake dome. For refrigerator storage, this is where this cheesecake truly shines. Once it’s completely cooled and the glaze is set, cover the entire springform pan tightly with plastic wrap, or transfer slices to an airtight container. It will stay absolutely delicious in the fridge for about 4-5 days. The flavors actually deepen overnight, which is why I always recommend chilling it thoroughly before slicing. For freezer instructions, you can freeze the cheesecake either whole (before glazing) or in individual slices. Wrap it very tightly in a couple of layers of plastic wrap, then a layer of aluminum foil. It can be stored in the freezer for up to 2-3 months. To thaw, transfer it to the refrigerator overnight. If you froze it unfrozen, you’ll want to apply the glaze after it has thawed and cooled. For glaze timing advice, if you’re planning to refrigerate it for a day or two before serving, apply the glaze right before you put it in the fridge. If you’re freezing it, it’s best to glaze it after thawing. This ensures the glaze stays lovely and glossy without getting condensation marks from the freezer.
Frequently Asked Questions
Final Thoughts
So there you have it – my ultimate Boston cream pie cheesecake! I truly believe this dessert is something special. It takes two beloved classics and creates a harmonious blend that’s both comforting and exciting. The moist cake base, the impossibly creamy custard-infused cheesecake, and that rich chocolate topping – it’s a symphony of textures and flavors that I just can’t get enough of. It’s the kind of dessert that makes a statement without being overly complicated, and it’s always met with rave reviews. If you’re a fan of Boston cream pie, or if you just love a truly decadent cheesecake, you absolutely have to give this a try. It’s become a staple in my recipe repertoire, and I have a feeling it will in yours too. Don’t be afraid to experiment with the glaze or serving suggestions; that’s part of the fun of baking! I can’t wait to hear what you think and how your Boston cream pie cheesecake turns out. Feel free to leave a comment below with your thoughts, any variations you tried, or your own favorite tips! Happy baking, everyone!
Boston Cream Pie Cheesecake
Ingredients
For the Cheesecake Base
- 226.8 g butter, melted
- 300 g graham cracker crumbs
- 50 g granulated sugar
For the Cheesecake Filling
- 907.2 g cream cheese, softened
- 200 g granulated sugar
- 3 large eggs
- 1 teaspoon vanilla extract
- 120 ml heavy cream
For the Boston Cream Pie Topping
- 240 ml milk
- 50 g granulated sugar
- 20 g cornstarch
- 2 large egg yolks
- 1 teaspoon vanilla extract
For the Chocolate Ganache
- 170 g semi-sweet chocolate chips
- 120 ml heavy cream
Instructions
Preparation Steps
- Preheat oven to 175°C (350°F). Grease and line a 23cm (9-inch) springform pan.
- For the base: In a bowl, combine graham cracker crumbs, sugar, and melted butter. Press the mixture evenly into the bottom of the prepared springform pan.
- For the filling: In a large bowl, beat cream cheese and sugar until smooth. Add eggs one at a time, beating well after each addition. Stir in vanilla extract and heavy cream.
- Pour the cheesecake filling over the graham cracker base.
- Bake for 60 minutes, or until the edges are set and the center is slightly jiggly.
- Turn off the oven and let the cheesecake cool inside with the door slightly ajar for 1 hour. This prevents cracking.
- Remove from oven and let cool completely at room temperature, then refrigerate for at least 4 hours, or preferably overnight.
- For the Boston cream pie topping: In a saucepan, whisk together milk, sugar, cornstarch, and egg yolks. Cook over medium heat, stirring constantly, until thickened. Remove from heat and stir in vanilla extract. Let cool slightly.
- Pour the slightly cooled Boston cream pie filling over the chilled cheesecake. Refrigerate again until the filling is set.
- For the ganache: Heat heavy cream in a small saucepan until simmering. Pour over chocolate chips in a heatproof bowl. Let stand for 5 minutes, then whisk until smooth and glossy.
- Pour the chocolate ganache over the set Boston cream pie filling, spreading evenly. Refrigerate until the ganache is firm.
- Carefully remove the sides of the springform pan before slicing and serving.


