


You know those nights? The ones where the clock is ticking, the fridge looks a little sad, and the thought of making anything complicated makes you want to just order pizza? Yeah, I’ve been there more times than I care to admit. But then I remember this Garlic Butter Chicken. It’s the recipe that swoops in like a culinary superhero, turning simple ingredients into something truly spectacular. It’s got that rich, comforting flavor that just hugs you from the inside out, and honestly, it tastes way more fancy than it has any right to. If you love the idea of a restaurant-quality dish without all the fuss, you’re in for a treat. This garlic butter chicken is my secret weapon for weeknight dinners and even special occasions when I want to impress without stressing.
What is garlic butter chicken?
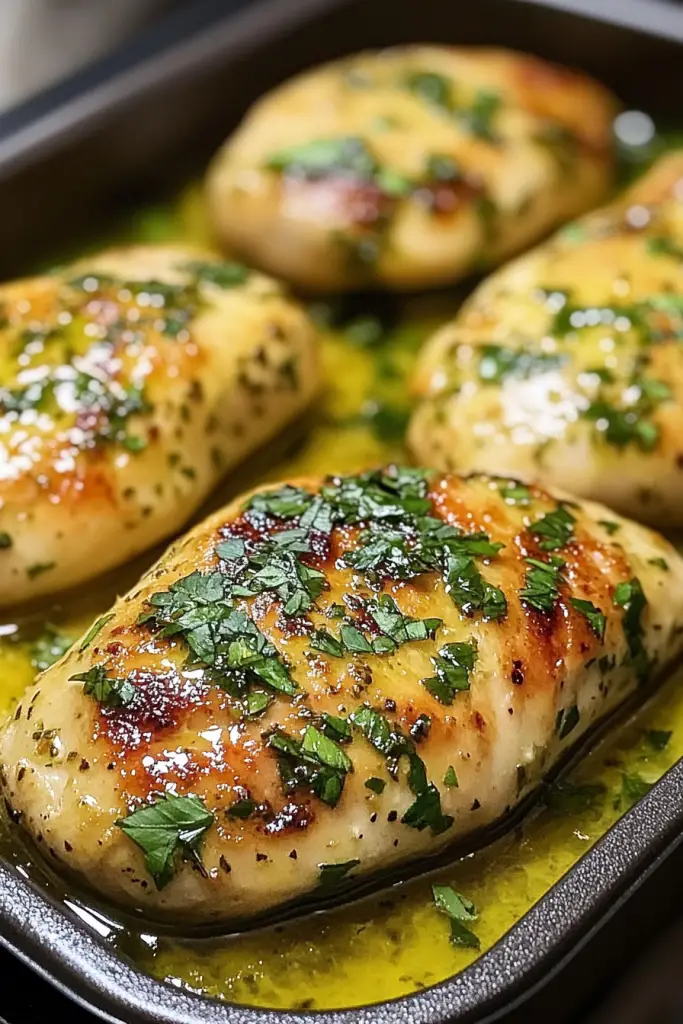
So, what exactly is this magical dish? Think of it as tender, juicy chicken pieces swimming in a dreamy, luscious sauce that’s packed with the irresistible aroma and flavor of garlic and butter. It’s not just chicken with some garlic and butter thrown on top; it’s a harmonious blend where the flavors meld together beautifully. We’re talking about chicken that’s been pan-seared to golden perfection, then finished in a sauce that’s rich, savory, and just slightly tangy, with a generous punch of garlic. It’s Comfort Food elevated, a dish that feels both indulgent and surprisingly easy to pull off. It’s the kind of meal that makes your kitchen smell absolutely divine and your family gather around the table with eager anticipation. It’s essentially happiness served on a plate.
Why you’ll love this recipe?
Honestly, there are so many reasons why this Garlic Butter Chicken has become a staple in my home, and I just know you’re going to fall in love with it too. First off, the FLAVOR is out of this world. That combination of garlic and butter, when cooked just right, creates a sauce that’s incredibly savory and satisfying. It coats the chicken beautifully, and every bite is just bursting with taste. You get that wonderful richness from the butter, balanced by the sharp, aromatic garlic, and the chicken itself is so tender and juicy. It’s the kind of dish that makes you close your eyes with pure enjoyment.
Then there’s the SIMPLICITY. I know I’ve mentioned it, but I can’t stress this enough. This recipe looks and tastes like it came from a fancy restaurant, but it’s honestly so straightforward. Most of the ingredients are probably already in your pantry. You don’t need any fancy techniques or special equipment. It’s perfect for those nights when you’re short on time but still want to serve something impressive. I’ve whipped this up after a long day at work and still had dinner on the table in under 45 minutes.
And let’s talk COST-EFFICIENCY. Chicken thighs are usually quite budget-friendly, and the other ingredients are pantry staples. You get so much flavor and satisfaction without breaking the bank. It’s a great way to make a delicious, filling meal that feels a little bit luxurious without the high price tag.
Finally, the VERSATILITY is a huge win. This garlic butter chicken is amazing on its own, but it’s also fantastic served over rice, pasta, or even with some crusty bread for soaking up all that glorious sauce. You can easily change up the herbs you use, add a pinch of red pepper flakes for a little heat, or even throw in some mushrooms or spinach for extra veggies. It’s adaptable and always delicious. What I love most about this recipe is how it consistently delivers on taste and ease, making it a reliable go-to that never disappoints.
How do I make garlic butter chicken?
Quick Overview
This garlic butter chicken recipe is all about building layers of flavor without a lot of fuss. We’ll start by searing chicken pieces until they’re golden brown and juicy. Then, we’ll create a simple yet incredibly Flavorful Garlic Butter Sauce right in the same pan, letting all those delicious browned bits meld in. Finally, we’ll return the chicken to the pan to soak up all that goodness. It’s a one-pan wonder that’s quick, easy, and utterly delicious, perfect for any night of the week when you crave something comforting and impressive.
Ingredients
For the Chicken:
1.5 lbs boneless, skinless chicken thighs, cut into 1-inch pieces
1 tablespoon olive oil
Salt and freshly ground Black Pepper to taste
For the Garlic Butter Sauce:
4 tablespoons unsalted butter
6-8 cloves garlic, minced (I’m not shy with garlic, but you do you!)
1/2 cup chicken broth (low sodium is great)
1/4 cup heavy cream (or half-and-half for a lighter version)
1 tablespoon fresh lemon juice
2 tablespoons fresh parsley, chopped (for garnish and freshness)
Optional additions for extra flair:
Pinch of red pepper flakes for a little heat
1/4 cup grated Parmesan cheese stirred into the sauce at the end
Step-by-Step Instructions
Step 1: Preheat & Prep Pan
Grab a large skillet – one that’s oven-safe if you plan to finish it in the oven, though this recipe is perfectly happy on the stovetop. Place it over medium-high heat. Add the olive oil. You want the pan to be nice and hot before the chicken goes in, which helps create that lovely golden crust. While the pan heats up, make sure your chicken pieces are cut to a uniform size so they cook evenly. Pat them dry with paper towels – this is a key step for getting that good sear! Season the chicken generously with salt and pepper.
Step 2: Mix Dry Ingredients
This step is straightforward! You’ve already seasoned your chicken with salt and pepper, which are the main “dry ingredients” for the chicken itself. The real magic of “mixing” for this recipe happens more in the saucing stage. Just ensure your chicken pieces are well-seasoned before they hit the hot pan. Proper seasoning upfront makes a huge difference in the final flavor profile, so don’t be shy with the salt and pepper!
Step 3: Mix Wet Ingredients
While the chicken is searing (or just before you start), you’ll want to have your garlic minced and your herbs chopped. This sauce comes together quickly, so having everything prepped and ready to go makes the process super smooth. You’ll be adding butter, minced garlic, chicken broth, heavy cream, and lemon juice to the pan in sequence. Ensure your garlic is finely minced so it infuses the butter beautifully without burning. Having the lemon juice ready is also important as it adds that bright finish at the end.
Step 4: Combine
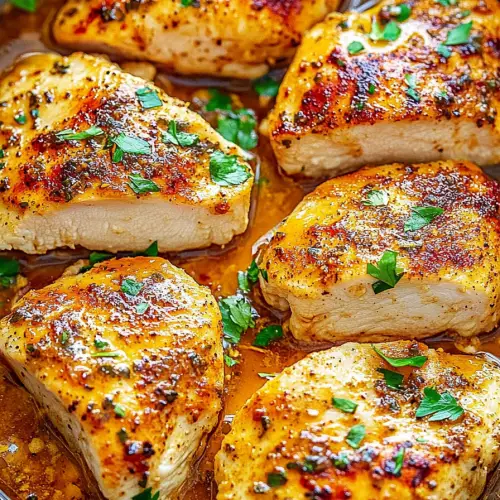
This is where the action happens! Add your seasoned chicken pieces to the hot skillet in a single layer, being careful not to overcrowd the pan. You might need to do this in batches. Sear the chicken for about 3-4 minutes per side, until it’s beautifully golden brown and cooked through. Don’t worry about it being cooked completely through at this stage, as it will finish cooking in the sauce. Once seared, remove the chicken from the skillet and set it aside on a plate. Don’t wipe out the pan – all those little browned bits are flavor gold!
Step 5: Prepare Filling
The “filling” in this recipe is really our glorious garlic butter sauce. So, into that same skillet where you seared the chicken, add the 4 tablespoons of butter. Let it melt over medium heat. Once melted, add the minced garlic (and red pepper flakes, if you’re using them). Sauté the garlic for about 1 minute until it’s fragrant and just starting to turn golden. Be careful not to burn it! Pour in the chicken broth and scrape up any browned bits from the bottom of the pan – this is where so much flavor comes from. Let the broth simmer for a minute to reduce slightly. Then, stir in the heavy cream and lemon juice. Bring the sauce to a gentle simmer and let it thicken slightly, about 2-3 minutes. Taste and adjust seasoning if needed. If you’re adding Parmesan, stir it in now until melted and smooth.
Step 6: Layer & Swirl
Once your garlic butter sauce is simmering and has thickened beautifully, it’s time to bring the chicken back into the party. Return the seared chicken pieces (and any juices that have accumulated on the plate) to the skillet. Gently toss the chicken in the sauce to coat every piece. Let it simmer for another 2-3 minutes, allowing the chicken to finish cooking and absorb all that incredible garlic butter goodness. The sauce should thicken just enough to cling to the chicken, creating a luscious, glossy coating.
Step 7: Bake
While this recipe is fantastic cooked entirely on the stovetop, you can also finish it in the oven if you prefer. If your skillet is oven-safe, you can pop it into a preheated oven at 375°F (190°C) for about 5-7 minutes after adding the chicken back to the sauce. This helps the flavors meld even further and ensures the chicken is perfectly tender. However, as I said, keeping it on the stovetop works just beautifully and is often quicker!
Step 8: Cool & Glaze
Once the chicken is cooked through and coated in the luscious sauce, it’s ready to come off the heat. Let it rest for just a couple of minutes before serving. This allows the juices to redistribute, making the chicken even more tender. Just before serving, sprinkle generously with fresh chopped parsley for a burst of color and freshness. If you opted for Parmesan, it’s already incorporated into the glaze!
Step 9: Slice & Serve
You don’t really need to slice the chicken pieces further as they’re already bite-sized. Serve this glorious garlic butter chicken hot, spooning plenty of that incredible sauce over the top. It’s absolutely divine over fluffy white rice, creamy mashed potatoes, or even your favorite pasta. The key is to ensure everyone gets a good amount of sauce – it’s too good to waste!
What to Serve It With
Oh, the possibilities are endless when it comes to pairing this incredible garlic butter chicken! For a truly decadent BREAKFAST or BRUNCH, imagine serving it alongside fluffy scrambled eggs and perhaps some crispy bacon or breakfast potatoes. It adds a savory, satisfying element that’s a delightful departure from the usual. I sometimes serve small portions with a side of toasted sourdough for a truly indulgent start to the day.
When we’re thinking more along the lines of a celebratory BRUNCH or a lovely lunch, I love pairing it with a light, vibrant green salad. Think mixed greens with a zesty vinaigrette, maybe some cherry tomatoes and cucumber. It’s also fantastic over a bed of creamy polenta or even mixed into a pasta salad for a more substantial dish. For an elegant touch, a side of roasted asparagus or steamed green beans works beautifully.
As a straight-up main course DESSERT alternative (hear me out!), this garlic butter chicken is pure comfort. It’s fantastic with a side of buttered noodles, or even just a hunk of warm, crusty bread to mop up every last drop of that amazing sauce. My family often requests it with simple steamed broccoli or a quick side of rice when they want something satisfying and delicious without much fuss.
And for those COZY SNACKS moments, especially on a chilly evening, it’s wonderful served with some warm flatbread or pita bread. You can even serve it as a warm dip with tortilla chips! My kids particularly love when I serve it over homemade mashed potatoes. It’s that perfect balance of comforting, flavorful, and easy, making it a hit for any occasion, really.
Top Tips for Perfecting Your Garlic Butter Chicken
I’ve made this garlic butter chicken more times than I can count, and over the years, I’ve picked up a few little tricks that really elevate it from good to absolutely incredible. First off, for the ZUCCHINI PREP – oh wait, this isn’t a zucchini recipe! My apologies, I was just thinking about another favorite. Let’s get back to the chicken. For the chicken itself, the key to juicy, tender results is to use chicken thighs. They have more fat than breast meat, which keeps them from drying out. When you cut them, aim for roughly uniform pieces so they cook evenly. And that pat-dry step? It’s crucial for getting a beautiful golden-brown sear, which adds so much flavor and texture. Don’t skip it!
When it comes to MIXING ADVICE for the sauce, the most important thing is not to burn your garlic. Garlic is delicate, and burnt garlic tastes bitter and ruins the whole dish. Keep the heat on medium-low when you sauté it, and stir constantly. You just want it fragrant and golden, not brown and crispy. Also, when you add the chicken broth and scrape up the browned bits, that’s called deglazing, and it’s where a lot of the depth of flavor comes from. Don’t be afraid to get in there with your spoon! For the sauce consistency, you want it to be silky and slightly thickened, enough to coat the chicken beautifully. If it gets too thick, you can always thin it out with a splash more chicken broth or water.
I haven’t really experimented with SWIRL CUSTOMIZATION in this particular recipe, as it’s more of a sauce-based dish. However, for a similar pan-sauce recipe, you could swirl in some pesto or a dollop of sun-dried tomato paste at the very end for a different flavor profile and visual appeal.
As for INGREDIENT SWAPS, chicken breasts can be used, but you’ll need to be extra careful not to overcook them. Sear them for less time, and ensure they are fully cooked when they return to the sauce. For a dairy-free version, you could try using a good quality plant-based butter and full-fat coconut milk or a rich oat cream instead of heavy cream. The flavor will be a bit different, but still delicious! If you don’t have chicken broth, vegetable broth works well too. For the lemon juice, a splash of white wine vinegar can add a similar tang.
My BAKING TIPS are mostly about stovetop cooking, but if you do finish in the oven, make sure your skillet is truly oven-safe. The oven can help the flavors meld even further, but it’s easy to overcook the chicken this way, so keep an eye on it. My preference is generally to finish it on the stovetop for better control. For doneness testing, the chicken should be cooked through with no pink inside, and the sauce should be rich and coating.
And for GLAZE VARIATIONS, besides the Parmesan cheese I mentioned, you could stir in a tablespoon of Dijon mustard for a little zing, or some finely chopped fresh dill or chives along with the parsley for a different herbal note. A tiny pinch of smoked paprika can add a lovely warmth and subtle smokiness. The key is to keep it simple so the garlic and butter shine through!
Storing and Reheating Tips
This garlic butter chicken is so good, you’ll probably want to savor every last bite, and thankfully, it stores and reheats beautifully! For ROOM TEMPERATURE storage, it’s best to let it cool down significantly before covering. I wouldn’t leave it out for more than two hours, as per food safety guidelines. Once cooled, transfer it to an airtight container. It will maintain its quality best when refrigerated.
When it comes to REFRIGERATOR STORAGE, this chicken is fantastic for up to 3-4 days. I usually store it in a shallow, airtight container to help it cool quickly and preserve freshness. The sauce will thicken up as it cools, which is perfectly normal. When you’re ready to reheat, there are a few options. On the stovetop is my favorite: transfer the chicken and sauce to a skillet over medium-low heat. Add a tablespoon or two of chicken broth or water to loosen the sauce and prevent it from drying out. Stir gently until it’s heated through. Alternatively, you can microwave it, covered, in short bursts, stirring halfway through, until piping hot.
FREEZER INSTRUCTIONS are also a go! If you want to freeze this, I’d recommend letting it cool completely first. Then, transfer it to a freezer-safe airtight container or a heavy-duty freezer bag. It should stay good in the freezer for up to 2-3 months. When you’re ready to thaw, move it to the refrigerator overnight. Reheat it on the stovetop as described above, adding a little liquid to refresh the sauce. It’s wonderful to have a portion of this ready to go for a quick and delicious meal.
Regarding GLAZE TIMING ADVICE, I always recommend adding the fresh parsley right before serving for the best color and flavor. If you’re storing leftovers, you can add it upon reheating if you like, but it’s not essential for the flavor of the reheated dish. The sauce itself will hold up well to reheating.
Frequently Asked Questions
Final Thoughts
So there you have it – my absolute favorite garlic butter chicken recipe. It’s a dish that brings me so much joy, not just because it tastes incredible, but because it’s proof that you don’t need to spend hours in the kitchen to create something truly special. It’s comforting, it’s flavorful, and it’s surprisingly simple to make. Whether you’re looking for a reliable weeknight dinner that will impress your family or a crowd-pleasing dish for guests, this recipe is a winner. It’s a testament to how a few simple, quality ingredients can come together to create pure magic. I truly hope you give this garlic butter chicken a try and that it becomes as much of a go-to for you as it is for me. If you love this recipe, you might also enjoy my creamy lemon herb chicken or my pan-seared chicken with white wine sauce – they have a similar elegant yet easy vibe! I can’t wait to hear how yours turns out, so please feel free to leave a comment below with your thoughts, any variations you tried, or even just to say hello! Happy cooking!
Garlic Butter Chicken
Ingredients
Main Ingredients
- 3 tablespoons olive oil
- 1.5 pounds boneless skinless chicken breasts pounded to an even thickness (4 average-sized breasts)
- 1.5 teaspoons 21 Salute Seasoning or poultry seasoning
- 1 teaspoon kosher salt or to taste
- 1 teaspoon freshly ground black pepper or to taste
- 0.5 cup white wine or chicken broth (or as necessary)
- 3 tablespoons unsalted butter or more if you want extra sauce
- 1 tablespoon garlic finely minced; or to taste
- 2 teaspoons fresh parsley optional for garnishing
Instructions
Preparation Steps
- To a large skillet, add the olive oil, pounded chicken, evenly season with 21 Salute, salt, pepper, and cook over medium-high heat for 5 minutes. Do not touch, move, or disturb the chicken while it is searing. After 5 minutes, flip chicken over. It should have a medium golden color. For thicker/bigger chicken breasts, sear for 6-7 minutes.
- Allow chicken to cook on the second side for about 5 minutes, or until done and cooked through. Again, do not disturb the chicken while it's searing.
- Remove chicken with a slotted spatula and place it on a plate to rest.
- Using caution, deglaze your skillet by adding wine (or broth) and allow the liquid to bubble up and steam violently for a few seconds.
- Add the butter and allow it to melt, about 1 minute; stir continuously until melted.
- Add the garlic and cook until fragrant, about 1 minute; stir continuously.
- Turn the heat off, add the chicken back into the skillet, flip it around in the garlic butter sauce, and spoon the sauce over the chicken.
- Optionally garnish with parsley and serve immediately.


