


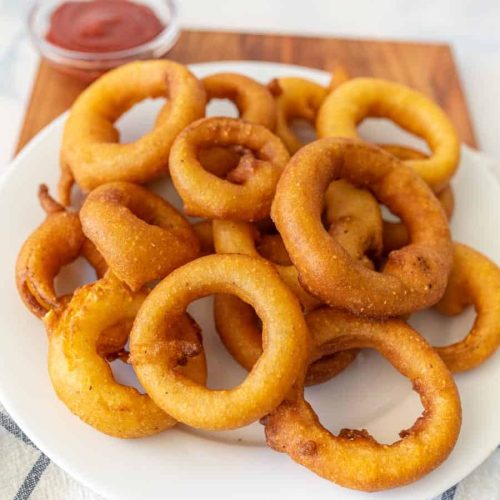
Oh, homemade onion rings. Just saying the words brings back such warm, fuzzy memories. I can practically smell them now – that irresistible aroma of sweet onion mingling with golden, crispy batter wafting through the kitchen. Growing up, my mom used to make these for special occasions, and to me, they were always the ultimate treat. It felt like a restaurant meal, but even better because it was made with so much love. Honestly, the store-bought ones just don’t even come close. They’re often soggy or have this weird, artificial taste. But when you make them yourself? It’s a whole different ballgame. I’ve tried a bunch of different recipes over the years, tweaking and tasting, and I finally landed on this one. It’s the one that gets rave reviews from everyone, from my picky eaters to my most discerning friends. If you’re craving that perfect crunch and sweet onion flavor, you’ve come to the right place. Get ready, because we’re about to make the best homemade onion rings ever.
What are some of the best home made onion rings?
So, what exactly are these magical rings of deliciousness we’re talking about? At their heart, homemade onion rings are simply sliced onions that have been coated in a batter and then fried until they’re perfectly golden brown and delightfully crispy. Think of them as the fancier, tastier cousin to French fries, but with that sweet, slightly pungent onion flavor as the star. The “homemade” part is key here. It means you get to control the ingredients, the thickness of the onion slice, and most importantly, the batter! We’re not just talking about a plain flour dredge here; we’re talking about a flavorful, perfectly seasoned batter that clings to the onion and fries up into pure bliss. It’s that satisfying *crunch* followed by the tender, sweet onion inside. It’s Comfort Food at its finest, really.
Why you’ll love this recipe?
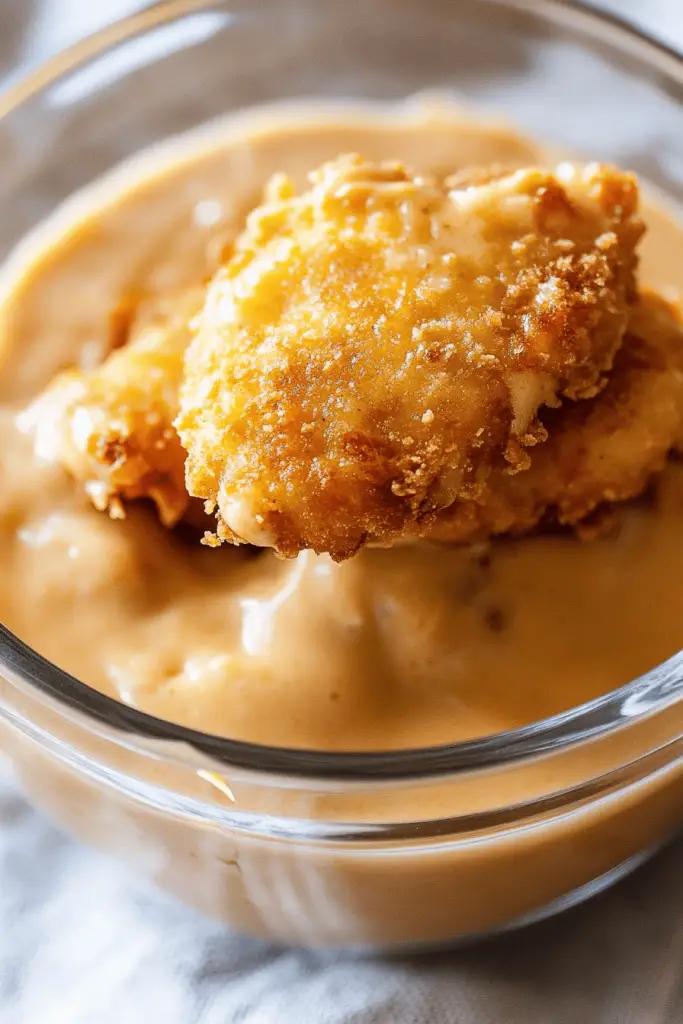
Okay, let me tell you why this particular recipe for homemade onion rings is my absolute go-to. First off, the flavor is just out of this world. We’re not just getting a basic onion flavor; the batter is seasoned with just the right blend of spices that really make the onion shine. It’s savory, slightly tangy, and utterly addictive. And the texture? Oh my goodness. These achieve that perfect balance: an incredibly crisp, shatteringly delicate outer layer that gives way to a perfectly cooked, sweet, tender onion slice. It’s not greasy, and it’s not heavy, which is a common pitfall with fried foods. What I also adore is how surprisingly simple this recipe is to execute. You might think frying is intimidating, but I’ve broken it down in a way that feels totally manageable, even for beginners. And let’s talk about cost-effectiveness! Onions are super affordable, and the batter ingredients are pantry staples. You can get a massive batch of these delicious homemade onion rings for a fraction of the cost of ordering them from a restaurant. Plus, the versatility! They’re fantastic on their own, of course, but they also make an amazing topping for burgers or a side for sandwiches. Honestly, they’re just so much better than anything you can buy, and the satisfaction of making them yourself is a huge bonus. This recipe stands out because it truly delivers on all fronts: incredible taste, satisfying texture, and ease of preparation. It’s a winner, hands down!
How do I make a homemade onion ring?
Quick Overview
Making these incredible homemade onion rings is all about preparing your onions correctly, creating a light and flavorful batter, and mastering the frying technique. The secret to their perfection lies in a few key steps: ensuring your onions are sliced evenly, getting your batter just right (not too thick, not too thin!), and frying them at the correct temperature so they crisp up beautifully without burning. It’s a straightforward process that really elevates the humble onion into something truly special. Don’t be intimidated by frying; I’ll guide you through it to ensure you get that amazing, golden-brown crunch every single time. Trust me, this is the method you’ll come back to again and again.
Ingredients
For the Onion Rings: A Novel.
2 large yellow onions (about 1.5 lbs total) – Yellow onions have a wonderful balance of sweetness and sharpness that fries up beautifully. You can use sweet Vidalia onions too if you prefer an even sweeter bite!
2 cups all-purpose flour
2 tablespoons cornstarch – This is my little secret for extra crispiness! It really helps achieve that shatter-like texture.
1 teaspoon baking powder – This makes the batter light and airy.
1 teaspoon salt
1/2 teaspoon Black Pepper
1/2 teaspoon paprika – For a hint of color and warmth.
1/4 teaspoon garlic powder – Adds a subtle savory note.
1.5 cups ice-cold beer or club soda – I swear by ice-cold liquid! Beer gives a fantastic depth of flavor and helps create a crispier crust. If you don’t want to use beer, club soda is a great alternative for carbonation and lightness.
For Frying:
Vegetable oil, canola oil, or peanut oil – You’ll need enough to submerge the onion rings, about 3-4 inches deep in your pot. These oils have high smoke points, which is crucial for deep frying.
Step-by-Step Instructions
Step 1: Prepare the Onions
First things first, let’s get those onions ready. Peel your onions and slice them about 1/4-inch thick. You want them substantial enough to hold their shape but not so thick that they won’t cook through. Once sliced, separate the rings. You’ll want to put these rings on paper towels and pat them dry really well. This is a crucial step for ensuring your batter adheres properly and they get nice and crispy. Excess moisture is the enemy of crispy fried foods!
Step 2: Mix Dry Ingredients
In a medium bowl, whisk together the flour, cornstarch, baking powder, salt, pepper, paprika, and garlic powder. Give it a good stir to make sure all the spices are evenly distributed. This dry mix forms the base of our delicious batter. You want to make sure there are no clumps, especially from the cornstarch. A good whisking here ensures even coating later on.
Step 3: Mix Wet Ingredients (Batter Time!)
Now, for the batter. In a separate bowl, gradually pour in your ice-cold beer or club soda into the dry ingredients. Whisk *just* until the ingredients are combined. A few small lumps are perfectly okay! Overmixing will develop the gluten in the flour, making your onion rings tough instead of light and crispy. The batter should have the consistency of pancake batter – thick enough to coat the onion rings, but not so thick that it’s gloopy. If it seems too thick, add a tablespoon of cold liquid at a time. If too thin, add a tablespoon of flour.
Step 4: Prepare for Frying
Pour your chosen frying oil into a heavy-bottomed pot or Dutch Oven to a depth of about 3-4 inches. Heat the oil over medium-high heat to 375°F (190°C). A good kitchen thermometer is your best friend here! You want the oil to be hot enough to cook them quickly and get them golden, but not so hot that they burn on the outside before the onion is tender. If you don’t have a thermometer, you can test the oil by dropping a tiny bit of batter in; it should sizzle immediately and float to the top.
Step 5: Coat the Onion Rings
Working in batches, dip each dry onion ring into the prepared batter, making sure it’s fully coated. Let any excess batter drip off for a second or two. Don’t overcrowd the batter bowl; you don’t want to handle the onions too much, as this can warm up the batter and affect the crispiness. I usually just use my fingers to coat and then let the excess drip back into the bowl.
Step 6: Fry the Rings
Carefully place the battered onion rings into the hot oil, being careful not to overcrowd the pot. You don’t want the temperature of the oil to drop too much. Fry them for about 2-4 minutes per side, or until they are a beautiful golden brown and wonderfully crisp. Use a slotted spoon or spider strainer to gently flip them and remove them from the oil. They cook quickly, so keep an eye on them!
Step 7: Drain and Season
As you remove the onion rings from the hot oil, place them on a wire rack set over a baking sheet. This is key to keeping them crispy – you don’t want them sitting in excess oil. Immediately sprinkle them with a little extra salt while they’re still hot. This is when the salt really adheres and makes a difference!
Step 8: Repeat and Serve
Continue frying the remaining onion rings in batches, making sure to let the oil come back up to temperature between each batch if needed. Serve your glorious homemade onion rings immediately while they are piping hot and at their absolute crispiest. They truly are best fresh out of the fryer!
What to Serve It With
These homemade onion rings are so incredibly versatile, they can seriously elevate so many meals! For a classic pairing, they are absolutely divine served alongside juicy burgers, hot dogs, or pulled pork sandwiches. That satisfying crunch against the tender meat is just pure magic. If you’re looking for a more substantial meal, they make an amazing side for steak or fried chicken. We often have them as part of a “finger food feast” night with chicken tenders, Mozzarella Sticks, and a big platter of dipping sauces. For breakfast or brunch, believe it or not, they can be a surprising and delightful addition! Imagine them alongside some fluffy pancakes or even topping a hearty breakfast hash. And for dessert? Okay, hear me out: a sprinkle of powdered sugar and a drizzle of chocolate sauce can turn these into a surprisingly decadent sweet treat, especially if you use a slightly sweeter batter or a touch of sugar in the dry mix. My family loves them as a fun appetizer for game nights, dipped in ranch or a spicy sriracha mayo. They’re just that crowd-pleasing addition that makes any meal feel a little more special and fun!
Top Tips for Perfecting Your Homemade Onion Rings
After making countless batches of these delicious rings, I’ve picked up a few tricks that I think really make a difference. First, and I can’t stress this enough, is really getting those onions dry after slicing them. Seriously, pat them down with paper towels until you think they’re dry, and then pat them down again! Moisture is the enemy of crispiness, and it’s the number one reason why some homemade onion rings can turn out soggy. When you’re mixing the batter, remember my advice: *don’t overmix*. A few little lumps are a good thing! Overworking the batter will make your rings tough, and nobody wants a tough onion ring. You want that light, airy crispness. For frying, temperature is everything. I’ve learned that using a good thermometer is a game-changer. If the oil isn’t hot enough, they’ll absorb too much oil and be greasy. If it’s too hot, they’ll burn on the outside before the onion inside is tender. Aim for that sweet spot of 375°F (190°C). Always fry in batches; never crowd the pot. This is another big one for maintaining oil temperature and ensuring even cooking. If you cram too many in, the oil cools down, and you get sad, greasy rings. When it comes to ingredient swaps, I’ve tried different flours, and while all-purpose is classic, adding that cornstarch is non-negotiable for me if you want that extra crisp. For the liquid, I love the flavor beer adds, but a good quality club soda works wonderfully if you want something non-alcoholic or a lighter taste. And finally, drain them on a wire rack, not paper towels directly. This allows air to circulate and keeps the undersides from getting steamy and soft. It makes all the difference in achieving that ultimate crisp!
Storing and Reheating Tips
Okay, let’s talk about what happens if, by some miracle, you have leftovers! Homemade onion rings are definitely at their absolute best when they’re fresh out of the fryer. That golden crunch is unparalleled. However, if you do end up with some, storing them properly is key to salvaging some of that crispness. For short-term storage, your best bet is to let them cool completely and then store them in an airtight container at room temperature for up to a day. I find that putting a piece of parchment paper between layers helps prevent them from sticking together. For longer storage, you can refrigerate them in an airtight container for up to 2-3 days. They won’t be as crispy as when they were fresh, but they’ll still be tasty. Now, for reheating, this is where you can really bring them back to life! The absolute best method is to pop them into a preheated oven at around 375°F (190°C) for about 5-10 minutes, or until they’re heated through and re-crisped. You can also use an Air Fryer set to about 350°F (175°C) for a few minutes. I generally avoid the microwave, as it tends to make them a bit soft and chewy, which is the opposite of what we want. The goal is to get that crunch back!
Frequently Asked Questions
Final Thoughts
So there you have it – the recipe for truly spectacular homemade onion rings! I really hope you give this one a try. It’s the kind of recipe that makes you feel like a kitchen wizard, transforming simple ingredients into something so incredibly satisfying and delicious. It’s that perfect crunch, that sweet onion flavor, all wrapped up in a crispy golden package. It’s the kind of food that just brings smiles to people’s faces. Whether you’re making them for a weeknight treat, a special occasion, or just because you’re craving something utterly delicious, I promise they won’t disappoint. If you loved this recipe, you might also enjoy my recipe for crispy fried pickles or my ultimate loaded potato skins – they’re in a similar vein of delicious, crowd-pleasing comfort food! I can’t wait to hear how your homemade onion rings turn out. Please leave a comment below and tell me what you think, or share any of your own amazing variations. Happy cooking!
Homemade Onion Rings
Ingredients
Main Ingredients
- 2 large white or yellow onions
- 2 quarts light oil for frying (such as canola, vegetable, or corn oil)
- 1 cup cornmeal
- 2 cups all-purpose flour
- 0.33 cup granulated sugar
- 1 tablespoon baking powder
- 0.5 teaspoon salt
- 0.5 teaspoon garlic powder
- 2 large eggs
- 2 cups whole milk
Instructions
Preparation Steps
- Prepare your onions by slicing off the root and stem end. Remove the outer few layers of the onion skin. Slice the onion into 1/4 to 1/2 inch slices, it'll normally be 4-5 slices per onion. Use your hands to separate the onion slices from each other, without breaking them and keeping them in rings.
- Add your oil to a large Dutch oven or high-walled cast iron skillet and place it over medium-high heat to start heating your oil. If you have a paddle thermometer, you can clip it to the side to see the temperature (I recommend using a thermometer for best results).
- In a medium mixing bowl, add the cornmeal, flour, sugar, baking powder, salt, and garlic powder. Whisk to combine.
- Add the eggs and milk and stir to combine well.
- When your oil has reached 350° to 375°F, drop one onion ring into the batter. Press it into the batter with a fork and use the fork to remove it from the batter. Hold it over the bowl and allow the extra batter to run off a bit. Add the battered onion ring carefully to the hot oil.
- Repeat with a few more pieces of onion so that you have 4-6 in your pan, depending on the size (don’t crowd the pan or add too many).
- Let the onion rings cook for 3-5 minutes or until they are a deep golden brown. Use a spider strainer or a wire skimmer to remove the onion rings from the oil and place them on a paper towel-lined baking sheet.
- Repeat with remaining onion rings until they are all cooked, adjusting your burner temperature as needed to help maintain a steady oil temperature.
- Serve hot with your favorite dipping sauces.


