


Oh, where do I even begin with these apple streusel Cheesecake Bars? Honestly, if I had to pick just one dessert to eat for the rest of my life (a horrifying thought, I know!), these might just be it. They’re everything good and comforting rolled into one perfect bite. Imagine the tang of creamy cheesecake, the sweet-tart burst of baked apples, and that irresistible crunchy streusel topping, all nestled on a buttery crust. They’re like a hug for your taste buds. I first stumbled upon a version of this recipe years ago, and it’s been a staple in my kitchen ever since. My kids, bless their hearts, ask for them constantly, especially when the leaves start to turn and there’s that first crispness in the air. They’re so much easier to make than a whole cheesecake, but they deliver all that rich, decadent flavor. If you love a good apple pie and you’re a fan of cheesecake, then these apple streusel cheesecake bars are basically your dream come true. They’re a total lifesaver for last-minute gatherings or just when that sweet craving hits after dinner.
What are some good Apple Streusel Cheesecake bars?
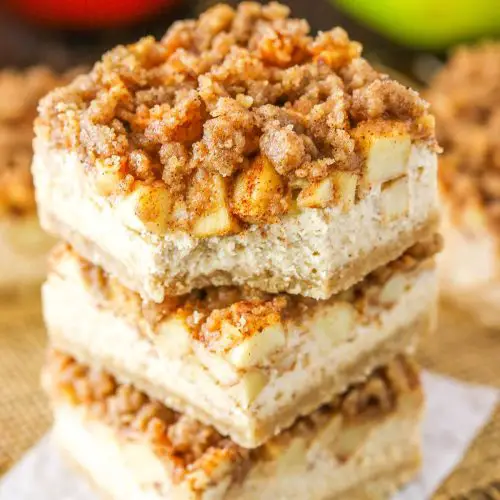
So, what exactly are these little slices of heaven? Think of them as your favorite apple pie and creamy cheesecake having a beautiful, delicious baby. They’re baked in a single pan, usually a square or rectangular one, which makes them super convenient. We start with a simple, buttery crust that’s a little bit like a shortbread or Graham Cracker crust, depending on how you make it. Then, we layer on a smooth, rich cheesecake filling that’s just the right amount of tangy and sweet. On top of that? A generous scattering of tender, spiced apples – usually Granny Smith for that perfect tartness, but I’ve used Honeycrisp too! And finally, the pièce de résistance: a crumbly, golden-brown streusel topping that’s buttery, sweet, and has just the right amount of cinnamon. It’s essentially all the best parts of fall baking, condensed into an easy-to-share bar. No fuss, no fancy decorating, just pure, unadulterated deliciousness. They’re often called “bars” because they’re meant to be cut into neat little squares, making them perfect for parties or picnics. It’s a no-mess, no-stress way to enjoy truly spectacular flavors.
Why you’ll love this recipe?
There are so many reasons why I keep coming back to this apple streusel cheesecake bar recipe, and I have a feeling you’ll fall in love with it for all the same reasons. First off, let’s talk about the FLAVOR explosion. It’s truly incredible. You get that luscious, creamy cheesecake that melts in your mouth, then the warm, spiced apples provide a burst of sweet-tart freshness, and that streusel topping? Oh my goodness, it adds this wonderful textural contrast and a comforting, cinnamon-kissed crunch. It’s a symphony of textures and tastes in every single bite.
But it’s not just about the taste; it’s also about the sheer SIMPLICITY. Honestly, if you can stir ingredients together and press them into a pan, you can make these. There’s no water bath needed like for a whole cheesecake, no tricky flipping or delicate maneuvering. It’s practically foolproof. I’ve even made these on a weeknight after a long day, and they always turn out beautifully.
And let’s not forget the COST-EFFICIENCY. While cheesecake can sometimes feel like an indulgence that costs a pretty penny, this bar version uses pretty standard pantry ingredients. Apples are usually affordable, and the dairy for the cheesecake is standard stuff. You get that gourmet dessert feel without breaking the bank.
What I love most, though, is the VERSATILITY. These aren’t just for holidays. I’ve brought them to potlucks, school events, and even just made them for a cozy movie night at home. They’re perfect for breakfast (don’t judge, a little bit of apple and cheesecake is basically a fruit serving!), amazing for brunch, and absolutely divine as a dessert. They’re also surprisingly good at room temperature if you’re taking them on a picnic. They hold up so well, and they’re just so satisfying. If you’ve ever enjoyed my Pumpkin Cream Cheese Bars: What are some good recipes for Pumpkin Cream Cheese Bars? or my classic Easy Apple PieIs there a sweet spot for a cookie?
How to Make Apple Streusel Cheesecake Bars
Quick Overview
Making these apple streusel cheesecake bars is a wonderfully straightforward process. We’ll start by pressing a simple buttery crust into the bottom of your baking pan. Then, you’ll whip up a smooth, creamy cheesecake filling and gently spread it over the crust. Next comes the best part: a generous layer of spiced, tender apples, followed by a glorious blanket of crunchy streusel topping. Bake it all until it’s golden and set, let it cool, and then slice it into perfect bars. It’s a layered masterpiece that comes together with minimal fuss but maximum delicious results. Trust me, it’s designed to be easy and forgiving, even for beginner bakers!
Ingredients
For the Crust:
- 1 ½ cups all-purpose flour
- ½ cup granulated sugar
- ¼ teaspoon salt
- ½ cup (1 stick) unsalted butter, cold and cubed
I like to use really cold butter for the crust because it creates those lovely flaky bits. You can also use graham cracker crumbs if you’re feeling classic – just use about 1 ½ cups of finely crushed crumbs and a little less sugar, around ¼ cup, and you might need a touch less butter, maybe 6 tablespoons. I’ve done both, and both are delicious!
For the Cheesecake Filling:
- 16 ounces (two 8-ounce packages) Cream Cheese, softened
- ½ cup granulated sugar
- 1 large egg, at room temperature
- 1 teaspoon vanilla extract
- 1 tablespoon lemon juice (optional, but it really brightens the flavor)
Make sure your Cream Cheese is truly softened! I usually leave it on the counter for at least an hour, or if I’m in a pinch, I’ll take the foil off and microwave it in 15-second bursts, stirring in between, until it’s just soft, not melted. Room temperature egg also helps everything emulsify nicely.
For the Apple Layer:
- 3 medium apples (about 2 cups chopped), peeled, cored, and diced (Granny Smith or Honeycrisp work best)
- 2 tablespoons granulated sugar
- 1 teaspoon ground cinnamon
- ¼ teaspoon ground nutmeg
- 1 tablespoon all-purpose flour
I prefer using firm, slightly tart apples like Granny Smith because they hold their shape well and their tartness balances the sweetness of the cheesecake. If you use a softer apple, they might get a little mushy, but it’ll still taste great! I always give the apples a good toss with the spices and sugar so they’re evenly coated. And that little bit of flour helps thicken up any juices released as they bake.
For the Streusel Topping:
- ½ cup all-purpose flour
- ⅓ cup packed light Brown Sugar
- ¼ teaspoon ground cinnamon
- ¼ cup (½ stick) unsalted butter, cold and cubed
The key to a great streusel is cold butter. It creates those wonderfully crumbly, irregular pieces that bake up golden and delicious. Don’t overmix this; you want it to look like coarse crumbs.
Step-by-Step Instructions
Step 1: Preheat & Prep Pan
First things first, preheat your oven to 350°F (175°C). I always make sure my oven rack is in the center. Then, grab an 8×8 inch or 9×9 inch square baking pan. If you want to make removing the bars easier later, line your pan with parchment paper, leaving an overhang on two opposite sides. This makes lifting the whole baked block out a breeze. Lightly grease the pan if you’re not using parchment, or grease the parchment itself. We want these bars to come out cleanly!
Step 2: Mix Dry Ingredients (Crust)
In a medium bowl, whisk together the flour, granulated sugar, and salt for the crust. Make sure they’re well combined. This ensures even flavor distribution throughout the crust.
Step 3: Mix Wet Ingredients (Crust)
Add the cold, cubed butter to the dry ingredients. Now, using a pastry blender, your fingertips, or a fork, cut the butter into the flour mixture until it resembles coarse crumbs with some pea-sized pieces of butter remaining. This is what gives the crust that lovely texture. Don’t overwork it; we want those little pockets of butter to melt and create flakiness.
Step 4: Combine (Crust)**
Pour the crumb mixture into your prepared baking pan. Press it down firmly and evenly across the bottom of the pan. You can use the bottom of a measuring cup or a flat-bottomed glass to get a nice, compact layer. Bake this crust for about 10-12 minutes, until it’s just starting to turn lightly golden. This pre-baking step helps prevent a soggy bottom.
Step 5: Prepare Filling
While the crust is in the oven, let’s make that dreamy cheesecake filling. In a medium bowl, beat the softened cream cheese with the ½ cup of granulated sugar until it’s smooth and creamy, with no lumps. This is super important for a silky texture! Then, beat in the egg, vanilla extract, and lemon juice (if using) until just combined. Be careful not to overmix at this stage; overbeating can incorporate too much air, which can cause the cheesecake to crack.
Step 6: Prepare Apple Layer
In a separate bowl, toss the diced apples with the 2 tablespoons of granulated sugar, cinnamon, nutmeg, and 1 tablespoon of flour. Stir until the apple pieces are evenly coated with the spice mixture. This little bit of magic helps tenderize the apples and adds that classic warm spice flavor we all love.
Step 7: Layer & Swirl
Once the crust is done baking, carefully remove it from the oven. Spoon the cheesecake filling evenly over the warm crust. Then, scatter the spiced apple mixture over the cheesecake layer. You don’t need to be super neat here; some apples sinking into the filling is totally fine and expected. You can gently press them down a little if you like. Now, for the streusel! In a small bowl, combine the ½ cup flour, brown sugar, and ¼ teaspoon cinnamon. Add the cold, cubed butter and use your fingers or a fork to work it together until it forms coarse crumbs. Sprinkle this glorious streusel topping evenly over the apples and cheesecake filling.
Step 8: Bake
Return the pan to the preheated oven. Bake for 30-35 minutes, or until the edges are set and lightly golden, and the center is just barely jiggly when you gently shake the pan. The streusel topping should be golden brown. Don’t overbake it, or the cheesecake will become dry. It’s okay if the center still has a slight wobble; it will continue to set as it cools.
Step 9: Cool & Glaze
This is probably the hardest part: letting them cool! Carefully remove the pan from the oven and place it on a wire rack. Let the bars cool completely in the pan, for at least 2-3 hours. You can even pop them into the refrigerator for an hour after they’ve cooled a bit to help them set up even more. Once completely cooled and set, you can lift the whole block out of the pan using the parchment paper overhangs. If you didn’t use parchment, you might need to run a thin knife around the edges to loosen them. If you want a glaze, you can whip up a simple powdered sugar glaze (powdered sugar whisked with a little milk or lemon juice until drizzly) and drizzle it over the top once they’re cooled. I sometimes skip the glaze altogether, and they’re still amazing.
Step 10: Slice & Serve
Use a sharp knife to cut the cooled bars into squares. For the cleanest cuts, you can dip your knife in hot water and wipe it dry between each cut. Serve them at room temperature or chilled. They are absolutely divine on their own, but a dollop of whipped cream or a scoop of vanilla ice cream never hurt anyone!
What to Serve It With
These apple streusel cheesecake bars are incredibly versatile, and honestly, they’re so good they don’t *need* anything else. But if you’re looking to create a full experience, here are a few ideas that I’ve personally tested and loved.
For Breakfast: Yes, I said breakfast! On a weekend morning, these are a treat. Serve them with a strong cup of coffee or a warm mug of apple cider. A small glass of fresh orange juice alongside is perfect. I love them slightly warmed so the cheesecake is extra creamy. They feel indulgent but are so easy for a relaxed start to the day.
For Brunch: Elevate them for a special brunch spread! Plate them prettily with a scattering of fresh berries or a drizzle of caramel sauce. They pair beautifully with a mimosa or a sparkling rosé. If you’re serving them buffet-style, cut them into smaller, bite-sized pieces so guests can try them along with other brunch favorites like frittatas or a fruit salad. They add that touch of decadent sweetness that always feels a bit celebratory.
As Dessert: This is their most obvious role, and they excel at it! Serve them after a hearty meal with a cup of black coffee or a digestif. I sometimes like to serve them with a small scoop of vanilla bean ice cream – the contrast of warm bar and cold ice cream is heavenly. A dusting of powdered sugar or a drizzle of salted caramel sauce takes them to the next level for a formal dinner party.
For Cozy Snacks: My personal favorite! These bars are perfect for an afternoon pick-me-up with a cup of tea, or as a late-night treat with a glass of cold milk. They’re the ultimate comfort food, especially when the weather turns chilly. My family often gravitates towards them after a busy day. They’re satisfying without being overly heavy, making them the ideal companion for reading a good book or catching up on your favorite shows.
These bars are a testament to how simple ingredients can create something truly spectacular. They’re a crowd-pleaser and a personal favorite, no matter the occasion!
Top Tips for Perfecting Your Apple Streusel Cheesecake Bars
I’ve made these bars more times than I can count, and through trial and error (and lots of tasting!), I’ve picked up a few tricks that I think really make a difference. Here are my top tips to help you achieve bar perfection every single time.
Apple Prep: Always use firm apples that hold their shape when baked. Granny Smith, Honeycrisp, or Fuji are my go-to choices. Peel, core, and dice them into relatively small, uniform pieces (about ½ inch). This ensures they cook evenly and become tender without turning to complete mush. Tossing them with the sugar and spices beforehand is crucial for even flavor distribution. If your apples seem a bit watery, you can lightly pat them dry with a paper towel after dicing to prevent excess moisture from making the filling too thin.
Mixing Advice: When making the cheesecake filling, the key is *softened* cream cheese. If it’s too cold, you’ll have lumps. If it’s melted, your filling will be too thin. Beat the cream cheese and sugar until completely smooth before adding the egg and vanilla. Then, mix *just until combined*. Overmixing the filling can incorporate too much air, which can lead to cracking during baking. For the streusel, cold butter is your best friend. Use your fingertips to rub the cold butter into the dry ingredients until it forms coarse crumbs. You want some larger, buttery pieces, not a fine paste.
Layering & Swirl Customization: While these bars are designed for simple layering, you can get creative! You don’t need to swirl the apples and cheesecake unless you want to. I usually just layer them as instructed. However, if you do want a swirl effect, dollop the apples over the cheesecake and then use a knife or skewer to gently marble them through. Don’t overdo it, or you’ll muddy the layers. For the streusel, ensure it’s sprinkled evenly for a consistent crunchy topping. Make sure to cover the entire surface, reaching close to the edges.
Ingredient Swaps: If you don’t have all-purpose flour, you can often substitute a gluten-free all-purpose baking blend in equal amounts for the crust and streusel. For the cream cheese filling, it’s trickier to swap, but full-fat block cream cheese is essential for the best texture. If you want a different fruit flavor, you could try spiced pears or even a mix of berries, but adjust the sugar and flour accordingly. For cinnamon, you can experiment with other warm spices like cardamom or ginger, but cinnamon is classic for a reason!
Baking Tips: Always preheat your oven thoroughly. Baking in the center rack ensures even heat distribution. Keep an eye on the bars as they bake. The edges should be set and lightly golden, and the center should have a slight wobble. It should *not* look wet or liquid. If the topping is browning too quickly, you can loosely tent the pan with aluminum foil. Remember that ovens vary, so rely on visual cues more than just the timer. Overbaking is the enemy of tender cheesecake!
Glaze Variations: While a simple powdered sugar and milk/lemon juice glaze is lovely, feel free to get creative! You can make a caramel glaze by melting caramel candies with a little cream. A cream cheese glaze (cream cheese, powdered sugar, vanilla, and a splash of milk) is also decadent. For a lighter option, a simple dusting of powdered sugar is perfect. If you plan to store these for a while or freeze them, I recommend glazing *after* they have thawed, or even just dusting with powdered sugar right before serving to prevent sogginess.
These little tips and tricks come from a lot of love and a few kitchen mishaps, but they’ve helped me make these apple streusel cheesecake bars consistently delicious. Happy baking!
Storing and Reheating Tips
One of the best things about these apple streusel cheesecake bars is how well they store, making them perfect for making ahead. I’ve put them to the test many times, and they always hold up beautifully. Here’s how I keep them fresh and delicious.
Room Temperature: If you plan to serve them within a day or two and your kitchen isn’t too warm, you can store the *un-glazed* bars at room temperature. Cover the pan tightly with plastic wrap or transfer the bars to an airtight container. They should stay fresh for about 1-2 days. I usually do this if I’ve just made them and plan to eat them the next day. Make sure they’re completely cooled before covering.
Refrigerator Storage: This is my most common storage method, and it works wonders. Once the bars are completely cooled, cover the pan tightly with plastic wrap or transfer them to an airtight container. They will keep well in the refrigerator for up to 4-5 days. The flavors actually meld and deepen over time, so they can taste even better on the second day! If you’ve glazed them, they’re best stored in the fridge too. Just be aware that some glazes might soften slightly over time.
Freezer Instructions: These bars freeze remarkably well, which is fantastic for whenever a craving strikes or you need a quick dessert! Once completely cooled, you can either freeze the entire pan (if you have space) or cut them into individual bars. Wrap each bar tightly in plastic wrap, then in a layer of aluminum foil, or place them in a freezer-safe airtight container, separating layers with parchment paper. They’ll keep their quality for up to 2-3 months. To thaw, simply transfer the frozen bars to the refrigerator overnight. If you’re reheating them, a few minutes in a low oven (around 300°F or 150°C) can bring back that fresh-baked warmth and texture, especially for the crust and streusel. Just be sure they’re fully thawed before reheating.
Glaze Timing Advice: For the best texture, I generally recommend adding any glaze *after* the bars have fully cooled and set, and ideally, right before serving or as close to serving as possible. If you are freezing them, it’s usually best to freeze the bars un-glazed and add the glaze once they’ve thawed and are ready to be eaten. This prevents the glaze from becoming sticky or cracking during freezing and thawing. If you must glaze before freezing, ensure it’s fully set. If you’re storing them un-glazed in the fridge, you can always add a simple dusting of powdered sugar just before serving.
Proper storage ensures these delightful apple streusel cheesecake bars remain a treat you can enjoy for days to come. Happy storing!
Frequently Asked Questions
Final Thoughts
So there you have it – my absolute favorite apple streusel cheesecake bars. I really hope you give them a try because, for me, they represent the perfect blend of comfort, indulgence, and pure deliciousness. They’re more than just a dessert; they’re a recipe that brings smiles to faces, whether it’s for a special occasion or just an ordinary Tuesday. They’re proof that you don’t need to be a pastry chef to create something truly spectacular in your own kitchen. The combination of the buttery crust, the creamy cheesecake, the tender spiced apples, and that irresistible streusel topping is just magical.
If you enjoyed these bars, I think you might also love my Lemon Raspberry Bars for a bit of tang, or my rich Chocolate Fudge Brownies for a serious chocolate fix. There are so many ways to explore delicious baking!
I can’t wait to hear what you think! Please leave a comment below and let me know how your apple streusel cheesecake bars turned out. Did you try any fun variations? I’m always curious to see how you all adapt recipes in your own kitchens. Happy baking, and may your bars be ever so delicious!
Apple Streusel Cheesecake Bars
Ingredients
Crust
- 1.5 cups all purpose flour
- 0.75 cup packed brown sugar
- 0.75 tsp ground cinnamon
- 0.5 cup salted butter, room temperature
Apple Topping
- 4.25 cups chopped apples (3-4 large apples)
- 1.5 tsp all purpose flour
- 1.5 tsp ground cinnamon
- 0.5 tsp ground nutmeg
Cheesecake Filling
- 20 ounces cream cheese, room temperature
- 0.75 cup packed brown sugar
- 3 tbsp all purpose flour
- 0.5 cup sour cream
- 1.5 tsp vanilla extract
- 1.75 tsp ground cinnamon
- 0.25 tsp ground nutmeg
- 2 large eggs, room temperature
- 1 large egg white, room temperature
Streusel Topping
- 0.5 cup all purpose flour
- 0.5 cup packed brown sugar
- 1.5 tsp cinnamon
- 0.5 tsp nutmeg
- 4 tbsp salted butter, melted
Instructions
Preparation Steps
- Preheat oven to 300 degrees F (150 degrees C) and prepare a 9x13 inch baking pan with parchment paper that extends above the sides for easy removal.
- In a medium bowl, combine the flour, brown sugar, and cinnamon for the crust. Cut in the butter until the mixture is crumbly.
- Press the crust mixture evenly into the bottom of the prepared pan and bake for 8-10 minutes. Once baked, increase the oven temperature to 325 degrees F (160 degrees C).
- In another large bowl, combine the chopped apples, flour, cinnamon, and nutmeg for the topping and set aside.
- To make the cheesecake filling, beat the cream cheese, brown sugar, and flour in a large mixer bowl on low speed until well combined and smooth. Scrape down the sides of the bowl.
- Add the sour cream, vanilla extract, cinnamon, and nutmeg to the cream cheese mixture and mix on low speed until well combined.
- Add the eggs and egg white one at a time, mixing slowly after each addition to combine. Scrape down the sides of the bowl as needed.
- Pour the cheesecake batter over the baked crust and spread evenly.
- Spread the prepared cinnamon apples evenly over the cheesecake filling.
- In a small bowl, combine the flour, brown sugar, cinnamon, and nutmeg for the streusel topping. Add the melted butter and stir until crumbly.
- Sprinkle the streusel topping evenly over the apples.
- Bake for 45-50 minutes, or until the center is just set. Remove from the oven and let cool on the counter for about 45 minutes, then refrigerate until cold and firm.
- Use the parchment paper to lift the bars out of the pan. Cut into bars and serve cold. Store covered in the refrigerator for up to 4-5 days.


