


I still remember the kitchen sun slanting across the counter when my grandma pulled a delicate, cloud-light cake from the oven. The air smelled like vanilla and summer rain, and somehow that airy little cake tasted like hope after a long day. I’ve chased that exact moment with every bake, and this angel food flag cake is my modern take—soft as a whisper, bright as a sunny porch, and incredibly forgiving. Think of it as the cousin of classic vanilla sponge, but lighter, sweeter, and absolutely show-stopping with fresh berries arranged like a tiny flag. It’s the kind of dessert that inspires oohs and smiles without needing a ton of effort—my kids actually ask for seconds, and you’ll see why when you slice into that billowy texture. This version is perfect for patriotic occasions, summer picnics, or simply a coffee-and-criendling moment with a friend who needs a little sweetness in their day. And yes, I’ve learned a trick or two along the way that makes it nearly effortless every single time.
What is Angel Food Flag Cake?
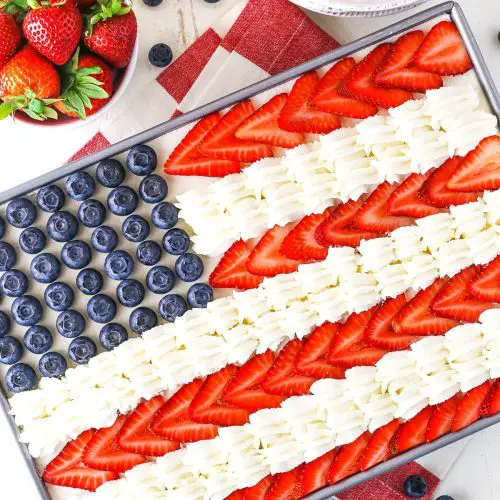
Angel food flag cake is essentially an airy angel food cake tiered or layered with whipped cream and fresh berries, arranged to resemble the American flag. Think of it as a light, dessert-forward canvas that lets the fruit do the talking. The name comes from the ethereal texture—the cake is all about egg whites whipped to glossy peaks and folded gently into a delicate batter, so it rises tall and pale, almost like a piece of edible cloud. Then you fill and decorate with whipped cream and a patriotic spread of strawberries and blueberries, creating that unmistakable red, white, and blue motif. It’s not complicated, and it’s definitely not fussy—the kind of cake you’d whip up when you want something stunning without spending hours in the kitchen.
Why you’ll love this recipe?
What I love most about this angel food flag cake is how the texture transforms with every bite. The cake itself is feather-light, with a gentle vanilla aroma that doesn’t overpower the berries, and the whipped-cream filling adds a creamy gloss that feels like a soft hug. It’s surprisingly simple to pull off, even on a busy weeknight, because you only need a handful of ingredients and a patient whisk of egg whites. And let me be real: it’s budget-friendly. Angel food cake uses egg whites, which means you can repurpose yolks in something else (custard, hollandaise, or homemade mayo) rather than letting them go to waste. The flavor balance—slightly sweet, a touch of vanilla, bright berries—means it plays nicely with coffee at breakfast, a bubbly brunch, or as a standout dessert after a salty dinner. This cake also travels well to potlucks, where a spotless white surface with pops of red and blue makes a big impression. If you’re craving something sweet that feels celebratory but not heavy, this is the one. I’ve tested it countless times, and the end result never fails to charm.
How do I make Angel Food Flag Cake?
Quick Overview
Here’s the simple arc: whip up a cloud-light angel food batter from egg whites and a delicate flour mixture, bake it into a tall, airy cake, and let it cool inverted so it keeps its height. Then whip cream, sugar, and a kiss of vanilla for the filling. Layer or slab the cake, fill with whipped cream and berries, and nestle a rectangle of blueberries at the top-left to mimic the flag’s blue canton, with strawberry stripes trailing to the right. A light glaze, if you like, brings a subtle shine. It reads as fancy, but it’s really just clever assembly with a few steady hands.
Ingredients
For the Main Batter:
- 12 large egg whites, room temperature
- 1 1/2 cups granulated sugar, divided
- 1 teaspoon cream of tartar
- 1/4 teaspoon salt
- 1 teaspoon vanilla extract
- 1 cup cake flour, sifted with 2 tablespoons cornstarch (for a lighter crumb)
For the Filling:
- 2 cups chilled heavy cream
- 1/4 cup powdered sugar
- 1 teaspoon vanilla extract
- 1 cup mixed berries (blueberries and sliced strawberries) plus extra for decorating
For the Glaze:
- 1 cup powdered sugar
- 2–3 tablespoons fresh lemon juice (or milk for a milder glaze)
- 1/2 teaspoon vanilla extract
Step-by-Step Instructions
Step 1: Preheat & Prep Pan
Preheat your oven to 350°F (175°C). Do not grease an angel food pan—the batter needs the uncoated surface to climb and hold its tall shape. If you’re using a round or Sheet Pan instead, line with parchment and lightly dust with flour to encourage airiness. Have a clean, dry mixing bowl ready and ensure the bowl is totally grease-free; any fat will weigh the meringue down and you’ll lose height.
Step 2: Mix Dry Ingredients
Sift the cake flour with the cornstarch and a pinch of salt. Then sift this flour mixture with a light hand to aerate and remove any lumps. A good, airy dry mixture is what gives your angel food cake that signature cloud-like crumb. Do this in a couple of passes so each spoonful lands light and fluffy into the batter.
Step 3: Mix Wet Ingredients
In a clean, dry mixer bowl, beat the egg whites on medium speed until they begin to look foamy. Add the cream of tartar and salt, then crank up the speed to medium-high and start sprinkling in the sugar a few tablespoons at a time. Whip until stiff, glossy peaks form. Beat in vanilla. You want a meringue that holds its shape firmly but isn’t dry. If you slip and overbeat, you’ll get dry, crumbly cake—not what we want here.
Step 4: Combine
Fold the dry ingredients into the meringue in three additions. Use a gentle, deliberate folding motion—soft overmixing is better than aggressive stirring here. You’re aiming for a uniform batter that lightens as you fold. When you lift, the batter should ribbon slowly back into itself. This is the magic that makes angel food cake so airy.
Step 5: Prepare Filling
Whip the heavy cream with powdered sugar and vanilla until soft peaks form. You’re aiming for a creamy, cloud-like texture that holds together when layered. If you want a bit more tang, fold in a teaspoon of lemon zest or a tablespoon of mascarpone for extra richness. Gently fold in a few berries so the color peeks through in ribbons rather than turning the mixture pink.
Step 6: Layer & Swirl
Pour the batter into your ungreased pan and smooth the top. Bake until the cake is pale gold and springs back when touched in the center, about 28–35 minutes. Invert the pan and let it cool completely—the cake needs to “set” into its tall form. If you’re stacking layers, carefully slice the cooled cake horizontally into two even rounds. Spread a thick layer of whipped cream over the bottom layer, scatter additional berries, and then place the second layer on top. To create the flag effect, decorate a blue canton on the upper left with blueberries, then lay slices of strawberries in neat stripes extending toward the right. The contrast is the party look we’re after.
Step 7: Bake
Keep an eye on the color—angel food should be pale, not browned. Once it’s set and springs back, test with a light touch; if it feels firm but springy, it’s done. Remove from the oven and immediately invert the pan into a column or place it on its feet to hang over a rack so it doesn’t compress as it cools. Let it cool completely, which could take about an hour or more. This step is where the magic happens: the height stays, the crumb stays tender, and you’ve got a cake that looks as good as it tastes.
Step 8: Cool & Glaze
Run a thin knife around the pan to loosen the cake and invert onto a serving plate. If you’re glaze-inclined, whisk the glaze ingredients until smooth and pour in a slow, generous sweep over the top, letting it drizzle down the sides. The glaze is optional, but I love a gentle gloss that echoes the berries. If you prefer a lighter finish, dust with a little powdered sugar instead.
Step 9: Slice & Serve
Slice with a serrated knife to keep the airy crumb intact. Wipe the knife between cuts for cleaner slices. This angel food flag cake is best served soon after assembly, but it also keeps well (see storing tips). Plate with extra berries on the side and a dollop of whipped cream if you like, and enjoy the way the colors pop against the pale cake.
What to Serve It With
For Breakfast: a tall glass of cold milk or a robust coffee makes the cake feel almost indulgent in the morning. A few fresh berries at the side and a light dusting of sugar feels celebratory without tipping into dessert territory.
For Brunch: pair with a sparkling beverage like pink moscato or brut coffee; arrange a mini fruit platter on the side and let guests assemble their own slice with extra whipped cream.
As Dessert: a simple cup of espresso or a tiny flute of champagne makes the perfect finish—this cake won’t overpower the palate, so the berry brightness can shine.
For Cozy Snacks: a quiet evening with a warm blanket and a slice of flag cake is a soul-soother. Serve with a mug of tea or hot chocolate and chat about your day.
My family has a slight tradition of making this for Fourth of July or Memorial Day, when the flag motif feels extra meaningful. The freshness of the berries and the airy crumb always sparks laughter and conversation around the table.
Top Tips for Perfecting Your Angel Food Flag Cake
Here are the tricks I rely on to keep this recipe consistently light and bright:
Egg Whites Prep: Make sure the whites are at room temperature; they whip up fluffier and hold air better. Any yolk or grease will ruin the meringue, so clean bowls only. I always wipe the bowls with a touch of lemon juice to cut any oil residue.
Mixing Air: Add sugar gradually to the meringue and whip until stiff, glossy peaks form. Don’t rush this step—air is your best friend here. If it looks dull, you may have overmixed and lost moisture.
Swirl Customization: For a bolder flag, reserve a few berries to press into the top after you add the filling. The visual effect of the blue canton with a neat stripe of red is what makes this cake special.
Ingredient Swaps: If you want a gluten-friendly version, try a gluten-free cake flour blend that’s been velcroed with a bit more starch; just be aware texture may shift slightly. For the filling, you can swap in lemon curd or vanilla custard for a creamier bite.
Baking Tips: Don’t open the oven during the first 20 minutes; the cake needs steady heat to climb. If your oven runs hot, rotate the pan halfway through to ensure even rise. Inverted cooling is essential to maintain that airy height.
Glaze Variations: Use a light LEMON GLAZE for brightness, or skip the glaze for a cleaner white-on-red-and-blue look. You can also dust with a tiny pinch of edible glitter for a party-ready finish.
Over the years, I’ve learned that patience and gentle folding are what keep this angel food flag cake from turning heavy. Trust me on this one: the lighter you keep the batter, the more dramatic the flag will look when you plate it.
Storing and Reheating Tips
Your angel food flag cake is at its best fresh, but you can stretch its life a little. Keep it covered in the refrigerator for up to 2 days if you’ve got a crowded fridge. For longer storage, you can wrap the whole cake tightly in plastic wrap and freeze for up to 1 month; thaw in the fridge overnight before serving. If you plan to glaze, drizzle on the glaze just before serving to keep the surface pristine.
Room Temperature: Up to 1 day if you’re in a cool kitchen; otherwise, the whipped cream filling will soften, and the cake becomes less structurally dramatic.
Refrigerator Storage: Store in an airtight container or covered with plastic wrap; this keeps the filling from absorbing fridge odors.
Freezer Instructions: Freeze slices or whole layers wrapped tightly in plastic and then foil. Thaw in the fridge for several hours or overnight for best texture.
Glaze Timing Advice: If you’re storing, skip the glaze until ready to serve to avoid sogginess. If you’ve already glazed, a light chill helps the glaze set and the berries stay bright.
Frequently Asked Questions
Final Thoughts
This angel food flag cake is the kind of dessert that makes people linger at the counter, plate in hand, while the last berry stain glows in the afternoon light. It’s not just a pretty face; the texture is a whisper-soft triumph, and the flavors feel bright without being cloying. The flag design is a tiny celebration—red for the strawberries, white of the whipped cream, and blue from the blueberries—reminding us that a few simple ingredients can paint a holiday in dessert form. If you’re new to whipping egg whites, this is your confident first step; if you’re a seasoned baker, you’ll appreciate how forgiving the batter can be when you stay patient and gentle. I’ve made this for kid birthdays, summer potlucks, and quiet Sunday afternoons, and it always earns a chorus of, “Is there more?” Happy baking, friends—let me know how yours turns out, and tell me if you tried a lemon glaze or a different berry palette. I’d love to hear your twists and photos.
Angel Food Flag Cake
Ingredients
Cake Ingredients
- 0.67 cup cake flour
- 1.08 cup granulated sugar divided
- 0.25 tsp salt
- 1 cup egg whites about 8 egg whites
- 1 tsp cream of tartar
- 1 tsp vanilla extract
Whipped Cream and Fruit
- 2 cups heavy whipping cream cold
- 1 cup powdered sugar
- 2 tsp vanilla extract
- strawberries sliced
- blueberries
Instructions
Preparation Steps
- Preheat oven to 375 degrees F. Have an ungreased 9x13 cake pan ready.
- Sift half of the sugar with the flour and salt. Repeat 5 times. Set aside.
- Whip egg whites with a mixer on low speed until frothy, then add vanilla extract and cream of tartar.
- Increase speed to medium and continue whipping, adding remaining sugar 1 tablespoon at a time.
- Increase to medium-high and whisk until stiff, glossy peaks, scraping sides and bottom of bowl once if needed.
- Sift about 1/4 cup of the flour mixture on top of the whipped egg whites and fold gently to incorporate. Repeat until all flour has been added.
- Add the batter to the cake pan, smooth the top, then run a knife through batter to break any air bubbles.
- Bake until lightly golden on top and a toothpick inserted in the middle comes out clean, about 15-20 minutes.
- Cool upside down for about 1 hour. You can use cans placed under each corner of the pan to elevate it.
- Once cooled, run a thin knife or offset spatula between the cake and the sides of the cake pan to loosen it.
- To make the whipped cream, add the heavy whipping cream, powdered sugar and vanilla extract to a large mixer bowl. Whip on high speed until stiff peaks form.
- Set aside about 1.5 cups of whipped cream and spread the rest into an even layer on top of the angel food cake.
- Use the sliced strawberries and blueberries to create the flag design.
- Use the remaining whipped cream to pipe "stripes" between the strawberry rows. You can use a piping bag and tip or a ziploc bag with the corner snipped off.
- Refrigerate cake until ready to serve. Cake is best when served the day it’s made because of the fresh fruit on top. If making ahead, add the fruit and whipped cream "stripes" shortly before serving.


